Scrapbook.com stopped by the KellyCraft booth at the CHA Create-n-Connect Show in Las Vegas last week to check out what we have that is new and exciting and they taped three videos; here is the first video featuring the Magnetized Multi-Mat

Our mission is to bring you high quality innovative products to enhance your craft experience while providing excellent customer service! The Get-It-Straight™ Laser Square utilizes a patent-pending sliding laser design, allowing you to quickly and easily align multiple objects - perfect for scrapbooking, stamping, quilting, school projects & more. Our Multi-Mat™ works perfectly with the Laser Square. We also have unique stamping options with our Jimbo Logik™ & Duck Commander® stamps!
Tuesday, July 30, 2013
Friday, July 26, 2013
KellyCraft at CHA Create n Connect in Las Vegas
We has a great time at the CHA Create n Connect Show in Las Vegas this week and will be sharing some videos, photos and our new product lines with you in the coming weeks......last week we gave you a sneak peak of our two new stamp lines that we were launching at the show and they were both very well received at the show and will be available in a variety of places.
Here is one of the Jimbo Lojik Stamp Sets just to give you an idea of just how funny they are:

There are eight sets in the Jimbo Lojik line and each one is sure to crack you up in laughter.....I'm just sayin!
Here is one of the Jimbo Lojik Stamp Sets just to give you an idea of just how funny they are:

There are eight sets in the Jimbo Lojik line and each one is sure to crack you up in laughter.....I'm just sayin!
Wednesday, July 24, 2013
All American Girl

I never would have attempted those letters across the page if I didn't have a KellyCraft Get-It-Straight Laser Square. It's perfect for lining up those horizontal and vertical lines, but it just works magic if you need angled words.
And the Spellbinders dies - these are flowers but they sure looked like fireworks to me!
Here's how I did it.
Supplies
KellyCraft™ Get-It-Straight™ Laser Square
Glue Dots® • Permanent Glue Dots® Dispenser • Continuous Glue Lines® Roll
Spellbinders • Grand Calibur
• M-BOSSABILITIES, Venitian
• SHAPEABILITIES PENDANTS, Snowflake
• NESTABILITIES, Adorning Squares
Die Cut Alphabet
Viva Décor Precious Metal Color
• Azure 600
• Pink 401
• Silver 902
• Gold 901
Viva Décor Pearl Pen, Gold
Clearsnap Smooch Pearly Accent Ink
• Sassy Pink
• Ocean Soul
• Silver Fox
• Gold Lamé
Cardstock
• Dark Blue, 12" X 12", (1)
• White, 8 1/2" X 11" (1)
• Red, 8 1/2" X 11" (1)
• Medium Blue, 8 1/2" X 11" (1)
ColorBox® Metallic Petal Point®" Ink
Dark Blue Ink Pad
White Glossy Paper, 8 1/2" X 11" (2)American flag, fabric, 4" x 5"
Your favorite manner of adhering individual die-cut letters
Star Charm
Red Ribbon, 1/8" , approximately 6"
Instructions
1. Paint glossy paper with Precious Metal Color, two colors per page, and set aside to dry.
2. Cut cardstock and emboss red and medium blue Venitian M-BOSSABILITIES. Trim blue to 5 1/4" X 7 1/4" and use direct-to-paper method to add silver ink . Trim red to 2 pieces, 7" X 2 3/4". Use direct-to-paper method to add dark blue ink to red embossed cardstock. Cut off 3" of one piece of red cardstock and fold it around and adhere it (using Permanent Glue Dots® Dispenser) to the piece you cut it from to make a pocket. Set aside.
 |
| Cut and fold red cardstock to make a pocket. Use Glue Dots to hold flag folds. |
4. On dark blue background, use KellyCraft Get-It-Straight Laser Square to align red embossed cardstock and red embossed pocket straight across page, and then add the photo layer on top. Cut journaling tag from white cardstock scrap and round corners. Cut a small oval of medium blue cardstock, punch holes and tie star charm to tag pull. Adhere pull to white tag and slide it into the pocket.
 |
| Align letters with the Laser Square and make a small journaling tag to slip in the pocket. |
6. Turn your page so that the KellyCraft Get-It-Straight Laser Square beam makes a line that begins near the right upper corner and goes to about 4" from the top of the left side. Adhere first row of letters. Without moving the page or Laser Square, bring the beam down approximately 2" and adhere the last word here.
7. Cut several of the flower shapes from the painted paper using the Snowflake dies, approximately two of each color. Adhere them to the upper portion of the page.
8. Fold flag, adding glue dots as needed to help the folds stay in place.
9. Add gold Pearl Pen to the corners of the square die. Allow to dry, then trim to make corners for the photo.
10. Add additional snowflake shapes as needed and enhance with Smooch.
I'm so happy with this page. I think I'll dig through my photo stash more often!
Saturday, July 20, 2013
Create-n-Connect Sneak Peak
We are so excited to share a sneak peak with you two of our brand new items that are debuting next Tuesday at the Create-n-Connect Show......two brand new Rubber Stamp Line that you are going to LOVE.....First....
 Jimbo has the perfect saying for everything and KellyCraft has taken those sayings and created a unique line of rubber stamps....just wait until you read these; you are going to want every set!
Secondly KellyCraft Innovations has teamed up with Ann Butler to create her Patent Pending Borderless Stamp Line in Clear Stamps.

These stamps are perfect for backgrounds, faux quilting, scrapbooking, mixed media, card making and so much more.....
Here is a peak at one of Ann's new stamp sets:
 We will be sharing more our new items shortly so check back!

Secondly KellyCraft Innovations has teamed up with Ann Butler to create her Patent Pending Borderless Stamp Line in Clear Stamps.

These stamps are perfect for backgrounds, faux quilting, scrapbooking, mixed media, card making and so much more.....
Here is a peak at one of Ann's new stamp sets:

Thursday, July 18, 2013
Heading to Las Vegas for Create-n-Connect

We are excited to be heading to the Create-n-Connect Conference and Trade Show
where we will be debuting some new products.....
that you are going to LOVE!
Check back next week as we will be sharing the new products
right her on our blog!
Tuesday, July 16, 2013
"Fish Stories" Scrapbook Layout with KellyCraft™ and Spellbinders®
Project by Cindi Bisson

The KellyCraft™ Get-It-Straight™ Laser Square made aligning the multiple components of this layout easy to achieve. I created two versions of this layout, the instructions for the first are below, and the second is almost identical, except some elements are reversed.
Materials:
KellyCraft™ Get-It-Straight™ Laser Square
Spellbinders® Grand Calibur® Machine
Spellbinders® M-Bossabilities™ Numbers and Letters
Spellbinders® Impressabilities™Circles
Spellbinders® Shapeabilities® Imperial Gold - Gold Elements
Bright green and orange white core cardstock
Orange and white number patterned paper
Blue & green plaid patterned paper
Grey measuring tape patterned paper
Craft Attitude™ Scrapbooking Attitude™
Glue stick
Making Memories Foam Stamps
Plaid® Folk Art® Acrylic Paint - Tangerine
Paintbrush, sandpaper, black marker
Glue Dots®
Westcott® Paper Trimmer
Copper mini brads, copper label holder
Instructions:
Cut 12 x 12” measuring tape patterned paper in half diagonally. Use
KellyCraft™ Get-It-Straight™ Laser Square to straightly mount onto green background paper, approximately 1/4” from top edge using Glue Dots®.

Use Get-It-Straight™ Laser Square to align strip of orange and white number paper straightly vertically approximately 1/2” from right edge and mount.

Emboss 5 x 7” bright green cardstock with Spellbinders® Grand Calibur® Machine and Spellbinders® M-Bossabilities™ Numbers and Letters.

Lightly sand to expose some white areas.

Emboss orange cardstock with Grand Calibur® and Spellbinders® Impressabilities™Circles.

From embossed orange cardstock, cut 2 corner embellishments with Grand Calibur® and Spellbinders® Shapeabilities® Imperial Gold - Gold Elements.

Lightly sand to expose some white areas.
Type fish words in various fonts, add fish images, REVERSE TEXT, and print onto Scrapbooking Attitude™.
Type “Sometimes” and “are true”, REVERSE TEXT and print onto Scrapbooking Attitude™.

Cut plaid patterned paper to 4 1/4 x 11”.
Apply tangerine paint to foam letter stamps, stamp onto plaid paper using
KellyCraft™ Get-It-Straight™ Laser Square to align lettering (*Note - I used two different sets of letter stamps so letters are not all of uniform size, but aligning the bottom edges of the foam stamps ensured straight placement.)

Trim title wording, fish words and fish from Scrapbook Attitude™. Apply glue stick to each title word (Sometimes, and, are true) and mount above and beneath foam stamped wording using Get-It-Straight™ Laser Square to ensure alignment.
Use Get-It-Straight™ Laser Square to align three small copper brads next to “are true” on title.
Mount title piece onto layout, using laser square to ensure alignment, approximately 1” from top edge, at right edge of paper.

Mount each fish word and fish image over strip of orange printed paper using Get-It-Straight™ Laser Square.

Cut mat from light blue cardstock approximately 1/8” larger on all sides than green embossed photo mat. Mount embossed piece to mat using Glue Dots®.

Add embossed die cut photo corners to top left and bottom right corners, mounting with Glue Dots®.
Add 4 x 6” photo, and mount to left bottom of page.
Cut strip of blue cardstock approximately 1/2” x 6”. Mount beneath left edge of smaller photo, and mount onto page overlapping larger photo.
Add copper label holder over photos. Add name & date to scrap of plaid paper and mount in label holder.


The KellyCraft™ Get-It-Straight™ Laser Square made aligning the multiple components of this layout easy to achieve. I created two versions of this layout, the instructions for the first are below, and the second is almost identical, except some elements are reversed.
Materials:
KellyCraft™ Get-It-Straight™ Laser Square
Spellbinders® Grand Calibur® Machine
Spellbinders® M-Bossabilities™ Numbers and Letters
Spellbinders® Impressabilities™Circles
Spellbinders® Shapeabilities® Imperial Gold - Gold Elements
Bright green and orange white core cardstock
Orange and white number patterned paper
Blue & green plaid patterned paper
Grey measuring tape patterned paper
Craft Attitude™ Scrapbooking Attitude™
Glue stick
Making Memories Foam Stamps
Plaid® Folk Art® Acrylic Paint - Tangerine
Paintbrush, sandpaper, black marker
Glue Dots®
Westcott® Paper Trimmer
Copper mini brads, copper label holder
Instructions:
Cut 12 x 12” measuring tape patterned paper in half diagonally. Use
KellyCraft™ Get-It-Straight™ Laser Square to straightly mount onto green background paper, approximately 1/4” from top edge using Glue Dots®.


Emboss 5 x 7” bright green cardstock with Spellbinders® Grand Calibur® Machine and Spellbinders® M-Bossabilities™ Numbers and Letters.

Lightly sand to expose some white areas.

Emboss orange cardstock with Grand Calibur® and Spellbinders® Impressabilities™Circles.

From embossed orange cardstock, cut 2 corner embellishments with Grand Calibur® and Spellbinders® Shapeabilities® Imperial Gold - Gold Elements.

Lightly sand to expose some white areas.
Type fish words in various fonts, add fish images, REVERSE TEXT, and print onto Scrapbooking Attitude™.
Type “Sometimes” and “are true”, REVERSE TEXT and print onto Scrapbooking Attitude™.

Cut plaid patterned paper to 4 1/4 x 11”.
Apply tangerine paint to foam letter stamps, stamp onto plaid paper using
KellyCraft™ Get-It-Straight™ Laser Square to align lettering (*Note - I used two different sets of letter stamps so letters are not all of uniform size, but aligning the bottom edges of the foam stamps ensured straight placement.)

Trim title wording, fish words and fish from Scrapbook Attitude™. Apply glue stick to each title word (Sometimes, and, are true) and mount above and beneath foam stamped wording using Get-It-Straight™ Laser Square to ensure alignment.
Use Get-It-Straight™ Laser Square to align three small copper brads next to “are true” on title.
Mount title piece onto layout, using laser square to ensure alignment, approximately 1” from top edge, at right edge of paper.

Mount each fish word and fish image over strip of orange printed paper using Get-It-Straight™ Laser Square.

Cut mat from light blue cardstock approximately 1/8” larger on all sides than green embossed photo mat. Mount embossed piece to mat using Glue Dots®.

Add embossed die cut photo corners to top left and bottom right corners, mounting with Glue Dots®.
Add 4 x 6” photo, and mount to left bottom of page.
Cut strip of blue cardstock approximately 1/2” x 6”. Mount beneath left edge of smaller photo, and mount onto page overlapping larger photo.
Add copper label holder over photos. Add name & date to scrap of plaid paper and mount in label holder.


Friday, July 12, 2013
Straight Lettering for a Tee Shirt
The KellyCraft Get-It-Straight Laser Square is such an amazing tool as it can be used in so many different ways.....just think about something you want to get straight and the Get-It-Straight Laser Square can do the job!

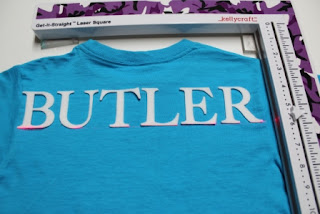


I turned the laser line on where I wanted to put the lettering on this tee shirt....

I lined up the letters and put them onto the shirt....

The cool part of these letters is that they are die cut from Velcro®
so they will be changeable with different fabrics.....
and always be straight thanks to the Get-It-Straight Laser Square!

Just another cool use for the Get-It-Striaght Laser Square!
Wednesday, July 10, 2013
Magnolia Card with KellyCraft & Spellbinders
Created by Lisa Rojas, Stampin' Queen Creations
Give The Queen A Call!
Hi Everyone,
When our Design Team Lead, Ann Butler, contacted us about doing a cross promotion with KellyCraft Get-it-Straight Laser Square and Spellbinders I was ecstatic! Everyone who follows my work knows that I'm totally in love with my Get-it-Straight Laser Square and have been since I first saw it at the CHA trade show last year! Well, I also love Spellbinders die-cutting machines and die cuts. Their die cuts have so much detail and creating with them is like a dream for a designer like me who loves lots of detail in my work.
This Magnolia card is very simple to create, but with all the delicate details in the die cuts that I used, this card also has an elegance to it that you cannot achieve with other die cuts on the market. And I think that is why Spellbinders products are so popular. I hope that you give this wonderful company a try. You won't be disappointed!
Magnolia Card

Finished Size- 6"W x 5 3/4"H
Supplies
Beacon Adhesives Zip Dry Paper GlueOffray Ribbon
Westcott Personal Paper Trimmer
Foam Circles
Rhinestones
Instructions

Gather all of your supplies. Cut Blue Calypso cardstock
6"W x 5 3/4"H for base card and Atlantic cardstock
5 3/4"W x 4 3/4"H for top layer.


Following manufacturer's instructions, use scraps of French Vanilla
cardstock and two die cuts from the Gold Labels Four set to cut
out die shapes.

Use stylist to add ink around edges.

Stamp flower twice on French Vanilla cardstock.

Use the Get-it-Straight Laser Square to line ribbon
up on larger shape.

Adhere larger shape to Atlantic cardstock using
the Laser Square. Wrap ribbon edges under cardstock.

Align smaller shape with Laser Square and adhere
to larger shape.

Cut out flowers and adhere foam dots to bottom
flower. Adhere flowers together.

Adhere layers together to the card base and flowers
to the card center. Use Laser Square to align card layers
and also to add rhinestones to the card.

Finished Magnolia Card

Magnolia Card- Side View
Monday, July 8, 2013
Thursday, July 4, 2013

Tuesday, July 2, 2013
Be-you-tiful with KellyCraft Get-It Straight Laser Square
Created by: LaJeania Hicks
I created this layout for my scrapbooking club for July. I absolutely love the Claire paper pack and the fun colors that it features. The dark blue and the pinks work so well together to make a fabulously girlie layout. I have used this layout design in the past and have struggled with getting the mats straight. Of course now that I have my KellyCraft Get-It-Straight Laser Square, that is no longer an issue and everything is lined up perfectly. The layout will soon feature pictures of our daughter just being herself, which of course is always be-you-tiful!

Supplies:
KellyCraft Get-It-Straight Laser Square
Claire Paper Pack – Close To My Heart
Outdoor Denim, Hollyhock, & Blush Ink Pads (CTMH)
Solid cardstock - Colonial White, Hollyhock, Blush, & Outdoor Denim (CTMH)
Sparkles – Clear, Pink, & Blue (CTMH)
KellyCraft Get-It-Straight Laser Square
Claire Paper Pack – Close To My Heart
Outdoor Denim, Hollyhock, & Blush Ink Pads (CTMH)
Solid cardstock - Colonial White, Hollyhock, Blush, & Outdoor Denim (CTMH)
Sparkles – Clear, Pink, & Blue (CTMH)
Spinner (CTMH)
Imagine
How-To Book -“Dynamic Due” Pattern pg.
48-49 (CTMH)
Girls Rock & Wheel of Life Stamp Sets – (CTMH)
Girls Rock & Wheel of Life Stamp Sets – (CTMH)
Alphilicious,
Art Philosophy, & Jasmine Cricut cartridges
Adhesive (Glue Dots, Pop Dots, Scotch)
Instructions:
1. After cutting all pieces of paper according to the layout guide in the how-to book, I sanded all of the cardstock to give the layout a softer look. I also sponge inked all of the patterned paper with Outdoor Denim ink.
Adhesive (Glue Dots, Pop Dots, Scotch)
Instructions:
1. After cutting all pieces of paper according to the layout guide in the how-to book, I sanded all of the cardstock to give the layout a softer look. I also sponge inked all of the patterned paper with Outdoor Denim ink.

2. Use your Get-It-Straight Laser Square to line up all pieces of patterned paper and cardstock.

3. Use your Get-It-Straight Laser Square to layer the mats and place them on the layout.
Don’t you just love layers!


5. And vertically!

6. Using the Get-It-Straight LaserSquare, I pop dotted the letters of my title to make it stand out.
7. What girlie layout would be complete without
some bling and flowers?
I added lots of both for the finishing touch.
Now to
print out the perfect pictures!
This layout was so simple and easy to put together using the Get-It-Straight Laser Square.
This layout was so simple and easy to put together using the Get-It-Straight Laser Square.
Subscribe to:
Posts (Atom)