Showing posts with label Westcott Brand. Show all posts

Friday, January 2, 2015

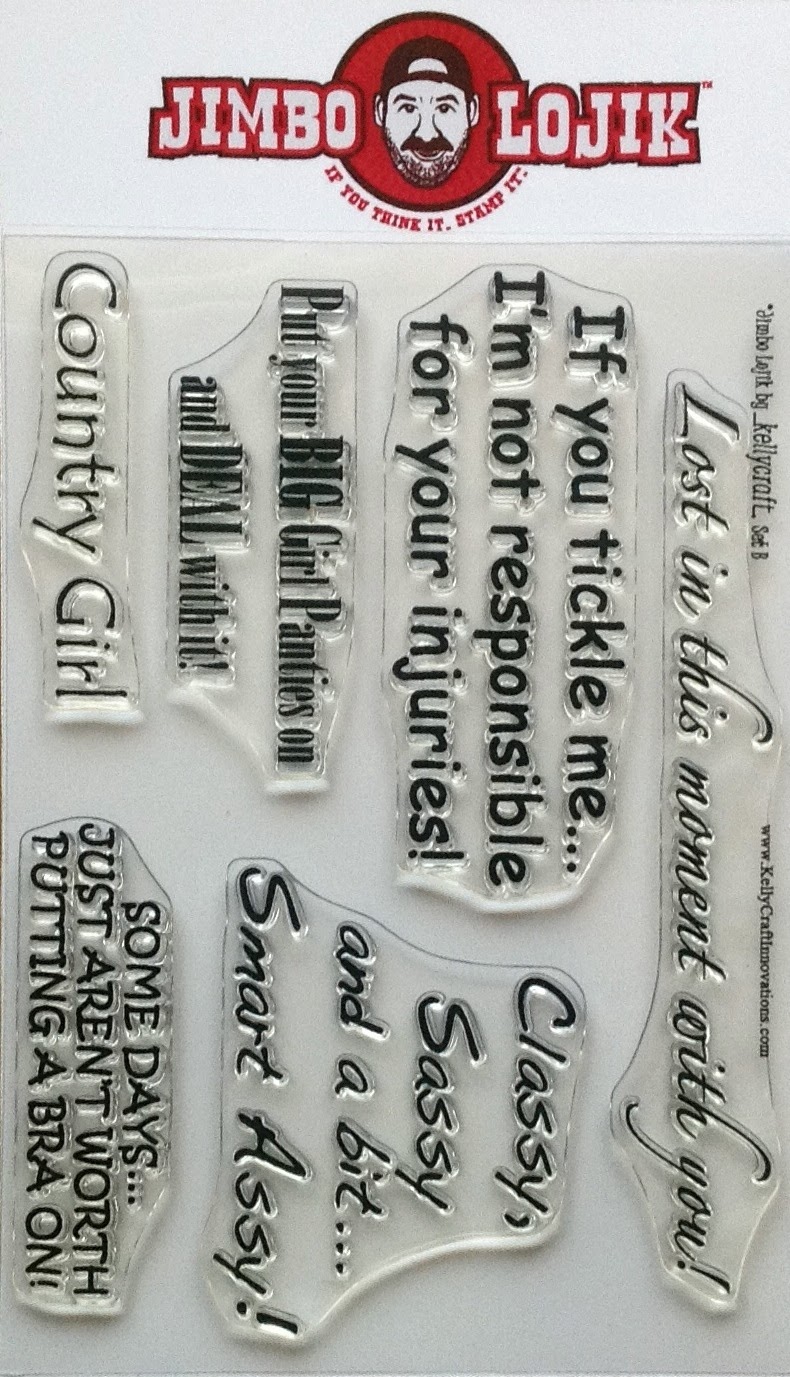
"Some Day's Aren't Worth Putting a Bra On!" Card by Cindi Bisson


"Some Day's Aren't Worth Putting a Bra On!"
Designed By Cindi Bisson

 Materials: 
KellyCraft™ - Get-it-Straight™ Laser Square
                    - Multi-Mat™
                    - Jimbo Lojik™ Set B 
Brick red, tan parchment card stock
Graphic 45® Domestic Goddess paper collection 
Clearsnap® ColorBox® Archival Dye ink pad - Suede 
Grey velvet 1/4 ribbon 
Grey vellum flower photo corners 
Aleene's® Quick Dry Tacky Glue® 
Westcott® Titanium Bonded Scissors, TrimAir Trimmer 


Instructions: 

1) Cut brick red card stock to 9" x 5 3/4".   Fold in half to form card. 

2) Ink verse with Suede ink.  Use Get-it-Straight™ Laser Square to align and stamp verse on tan parchment card stock. Ink edges of verse with Suede ink pad. Cut brick card stock mat for verse.  Mount.   Add flower photo corner to upper left an lower right corners. 

3) Cut patterned paper to 5 1/2" x 4".

4) Use Get-it-Straight™ Laser Square to align and mount centered on patterned paper.  Add grey vellum flower accents around verse.

5) Get-it-Straight™ Laser Square to align patterned paper with verse, centered on card front and mount.        
6) Mount grey velvet ribbon around patterned paper, using Get-it-Straight™ Laser Square to ensure ribbon is straight. 

Thursday, November 21, 2013

'Tis the Season Card

Created by Lisa Rojas, Stampin' Queen Creations
Give The Queen A Call!

The holidays are right around the corner (geez, did I just say that?) and we all need to get ready to create our holiday cards.  I will be sharing two different cards, this one and another for December.  When you're creating cards for the holidays you want them to be simple but pretty!  Of course with the Get-it-Straight Laser Square you'll have the simple part down!  And with your creativity if you choose to design your own, or even if you recreate this one, you'll definitely have the pretty!

'Tis the Season Card
Finished Size- 4 3/4"W x 7"H

Materials

Cardstock- Dark Green, Burgundy & Off-White
Holiday Pattern Paper
Holiday Themed Stickers
Pearl Stickers
Ribbon- Green
Ribbon Thread- Gold
Blending Stump
Holly Rubber Stamp

Instructions

Gather all of your supplies.  Cut papers as follows-
Dark Green- 4 3/4"W x 7"H, Burgundy- 3 3/4"W x 5 1/2"H
Off White- 3 1/4"W x 3 1/2"H and Pattern Paper
4 1/4"W x 2 1/2"H.


Run burgundy cardstock through the
Grand Calibur machine with die cut.

Stamp holly on off white cardstock.  Color with color
pencils.  Blend colors with Gamsol solution and a stump.

Run ribbon through bottom of card.  Attach gold thread ribbon to cardstock with needle.
Ink edges of papers.
Adhere stamped cardstock to
burgundy cardstock with Zip Dry.

to align papers

and adhere papers together with Zip Dry glue.

Align pearls to the top of the card with the
Adhere sticker to the bottom of the card.


Wednesday, October 16, 2013

EZ-De's Blog Hop with Clearsnap Day 3


Welcome to day 3 of our Blog Hop with Clearsnap featuring Ann Butler's new ink pads and Ann Butler's EZ-De's Stamps by KellyCraft Innovations!  The KellyCraft Design Team and Clearsnap Design Team will each be showcasing projects so be sure and check both blogs out all week long!

Created by Lisa Rojas, Stampin' Queen Creations
Give The Queen A Call!


This pillow project is very near and dear to my heart.  The pillow is special to me because I was able to create it using a brand new stamp line EZ-De”s™ by KellyCraft and a new inkpad line,
AnnButler Designs™ ColorBox Crafter’s™. Both of these fabulous new products were designed by my close friend and fellow designer, Ann Butler.  Ann sent her new line of stamps and inkpads to me and asked if I would design a project with them.  I was having so much fun playing with these stamps that I barely finished the project.  Ann’s stamps are so versatile they’re a blast to work with.  You can create all kinds of different patterns with them.  The new inkpads are so vibrant that the colors just pop off your fabric, paper or whatever project you’re working on.   I have always wanted to learn how to quilt but I just never seemed to find the time to learn.  This pillow project is my view on quilting and the best thing about it is there’s no sewing machine involved.  Now that’s my kind of quilting!


Materials
Flour Sack or Muslin, ½ yard
Pillow insert
Buttons Galore® Buttons, daisy delight, butterfly
Embroidery thread, white
Ribbon, 1”, lavender
Cardboard
Needle
Instructions
1. Fold flour sack or muslin in half and place a piece of cardboard in between.  Stamp pattern out first on a piece of paper.  Stamp out design on the fabric using the paper as a reference.  See photo for the colors and patterns that I used or create your own pattern. Place in dryer for 15 minutes to heat set.
2.  Place pillow insert in between the stamped fabric, pin the front in place leaving the back unattached.  Using white embroidery floss and a 3” long needle, attach buttons to stamped squares through the pillow insert but do not sew them to the back of the fabric.
3.  Wrap the back of the fabric around the back of the pillow insert and glue in place.   Pull the front tight and adhere to pillow.  Fold each side under three times and adhere to pillow insert.  Add ribbon to each corner of the pillow and tie in a bow. 


Visit Lisa's Blog

Wednesday, July 10, 2013

Magnolia Card with KellyCraft & Spellbinders


Created by Lisa Rojas, Stampin' Queen Creations
Give The Queen A Call!

Hi Everyone,

When our Design Team Lead, Ann Butler, contacted us about doing a cross promotion with KellyCraft Get-it-Straight Laser Square and Spellbinders I was ecstatic!  Everyone who  follows my work knows that I'm totally in love with my Get-it-Straight Laser Square and have been since I first saw it at the CHA trade show last year!  Well, I also love Spellbinders die-cutting machines and die cuts.  Their die cuts have so much detail and creating with them is like a dream for a designer like me who loves lots of detail in my work.

This Magnolia card is very simple to create, but with all the delicate details in the die cuts that I used, this card also has an elegance to it that you cannot achieve with other die cuts on the market.  And I think that is why Spellbinders products are so popular.  I hope that you give this wonderful company a try.  You won't be disappointed!

Magnolia Card


Finished Size- 6"W x 5 3/4"H

Supplies


Beacon Adhesives Zip Dry Paper Glue
Offray Ribbon
Westcott Personal Paper Trimmer
Foam Circles
Rhinestones

Instructions
Gather all of your supplies.  Cut Blue Calypso cardstock
6"W x 5 3/4"H for base card and Atlantic cardstock
5 3/4"W x 4 3/4"H for top layer.


Following manufacturer's instructions, use scraps of French Vanilla
cardstock and two die cuts from the Gold Labels Four set to cut
out die shapes.
Use stylist to add ink around edges. 

Stamp flower twice on French Vanilla cardstock.

Use the Get-it-Straight Laser Square to line ribbon
up on larger shape.

Adhere larger shape to Atlantic cardstock using
the Laser Square.  Wrap ribbon edges under cardstock.

Align smaller shape with Laser Square and adhere
to larger shape.

Cut out flowers and adhere foam dots to bottom
flower.  Adhere flowers together.

Adhere layers together to the card base and flowers
to the card center.  Use Laser Square to align card layers
and also to add rhinestones to the card.

Finished Magnolia Card


Magnolia Card- Side View

Monday, September 24, 2012

“Onward to 6th” with Kellycraft™’s Get-it-Straight™ Laser Square


I heard all the buzz about the Kellycraft™ Get-it-Straight™ Laser Square at CHA this summer.  I saw the demo.  But, until I had it here in my own studio and actually had a chance for some hands-on use, I didn’t fully understand how much it would truly SIMPLIFY aligning things! 

For this “Onward to 6th” scrapbook layout highlighting my son’s first day of middle school, I wanted to incorporate not only the colors from his shirt, but the rough feel of the lettering in the background paper.  As Thomas loves to craft with Duck Brand Tape, I thought what better embellishment than colorful Duck Tape on the layout! 


Materials: 
Kellycraft™ Get-it-Straight™ Laser Square
12” x 12” Black textured cardstock
12” x 12” BasicGrey patterned paper
Assorted chipboard letters
Elmer’s Craft Bond Dot Runner Adhesive
Duck Brand Tape - black, orange, bright green, yellow, turquoise, purple
Westcott Premium TrimAir Titanium Paper Trimmer
Westcott Craft Titanium Non-Stick Scissors


Instructions:


To begin, I trimmed 3/4” off the 12” x 12” patterned paper.  
I wanted the top border of the paper to be straight,


 so I used my Get-it-Straight™ Laser Square to be sure I aligned the top edge of the patterned paper 
on the 12” x 12” black cardstock (offset to the right edge so a black border remained on the left).


The lettering was created with random styles of chipboard lettering, 
each roughly covered with black Duck Tape. 


 Most often when scrapbooking, I arrange my title lettering in a haphazard manner - not always because the design called for it, but because lining up each letter before stamping or mounting was cumbersome.  When it came time to align my title for this project, I popped the background papers into the Get-it-Straight™ Laser Square, and voila - in no time I had mounted the title nice and straight on the top of the layout.


I repeated the same procedure to finish the title in the lower right corner of the page.


Next came the bright, funky arrows to symbolize moving “onward” to 6th grade.   Aligning each strip of colorful Duck Tape was super easy with the Get-it-Straight™ Laser Square.  And, ensuring an equal amount of space between each of the arrows was also simple using the tool.  I created this layout in no time at all, with no stress about aligning things - yet the result is a perfectly aligned project.   All I can say is wow!


Happy crafting and remember to "dare to be different!" - Cindi Bisson