Showing posts with label Kristin Kelly. Show all posts

Wednesday, November 12, 2014

"Work Hard, Nap Hard" Layout by Kristin Kelly


"Work Hard, Nap Hard" Baby Layout 
by Kristin Kelly 

Oh the life of a little one! When work was all about play and the naps were frequent. One might not think of a baby picture layout when looking at the new Duck Commander® stamps from KellyCraft™, but the 'Work Hard Nap Hard' stamp made me think of all the cute pictures we have of James doing his baby 'work' and the naps that followed :). 

Materials: 

KellyCraft™ - Get-it-Straight™ Laser Square
            - Multi-Mat™
            - Duck Commander® wood mount stamp - “Work Hard, Nap Hard”
Cricut™ Artiste cartridge
CTMH - Stardust paper
  - Keepsake and You Are My Happy alphabet stamps
    - Inks, sander and edge distresser
Scotch ATG 
Pop Dots
Paper trimmer, scissors 

Instructions:

Gather your supplies and cut your papers as follows: 
12x12 white card stock bases
(2) 6x12 pattern 1
(1) 6x8 and (1) 4x12 pattern 2
(2) 1x12 pattern 3
(4) 6 1/2x4 1/2 and (4) 3 1/2x3 1/2 blue mats
(2) 6 1/4x4 1/4 green mats

1) I like some good distressing, so I sanded my blue photo mats. Then I distressed the edges of the green photo mats. All other edges I inked with coordinating colors. 

2) Once you adhere the large patterned pieces, use your Get-it-Straight™ Laser Square and Multi-Mat™ to place your strips.  Adhere in place.  

An awesome thing about the laser is that it will shine all the way across both pages, so you will be sure your strips will match from page one to two!

And on a complete side note, it shines so far that if you have cats, they will be entertained while you scrapbook! Here's my cat Pumpkin trying to get the laser as I work :)


3) Now it's time to stamp your titles. I did not use my alphabet stamps very often because I
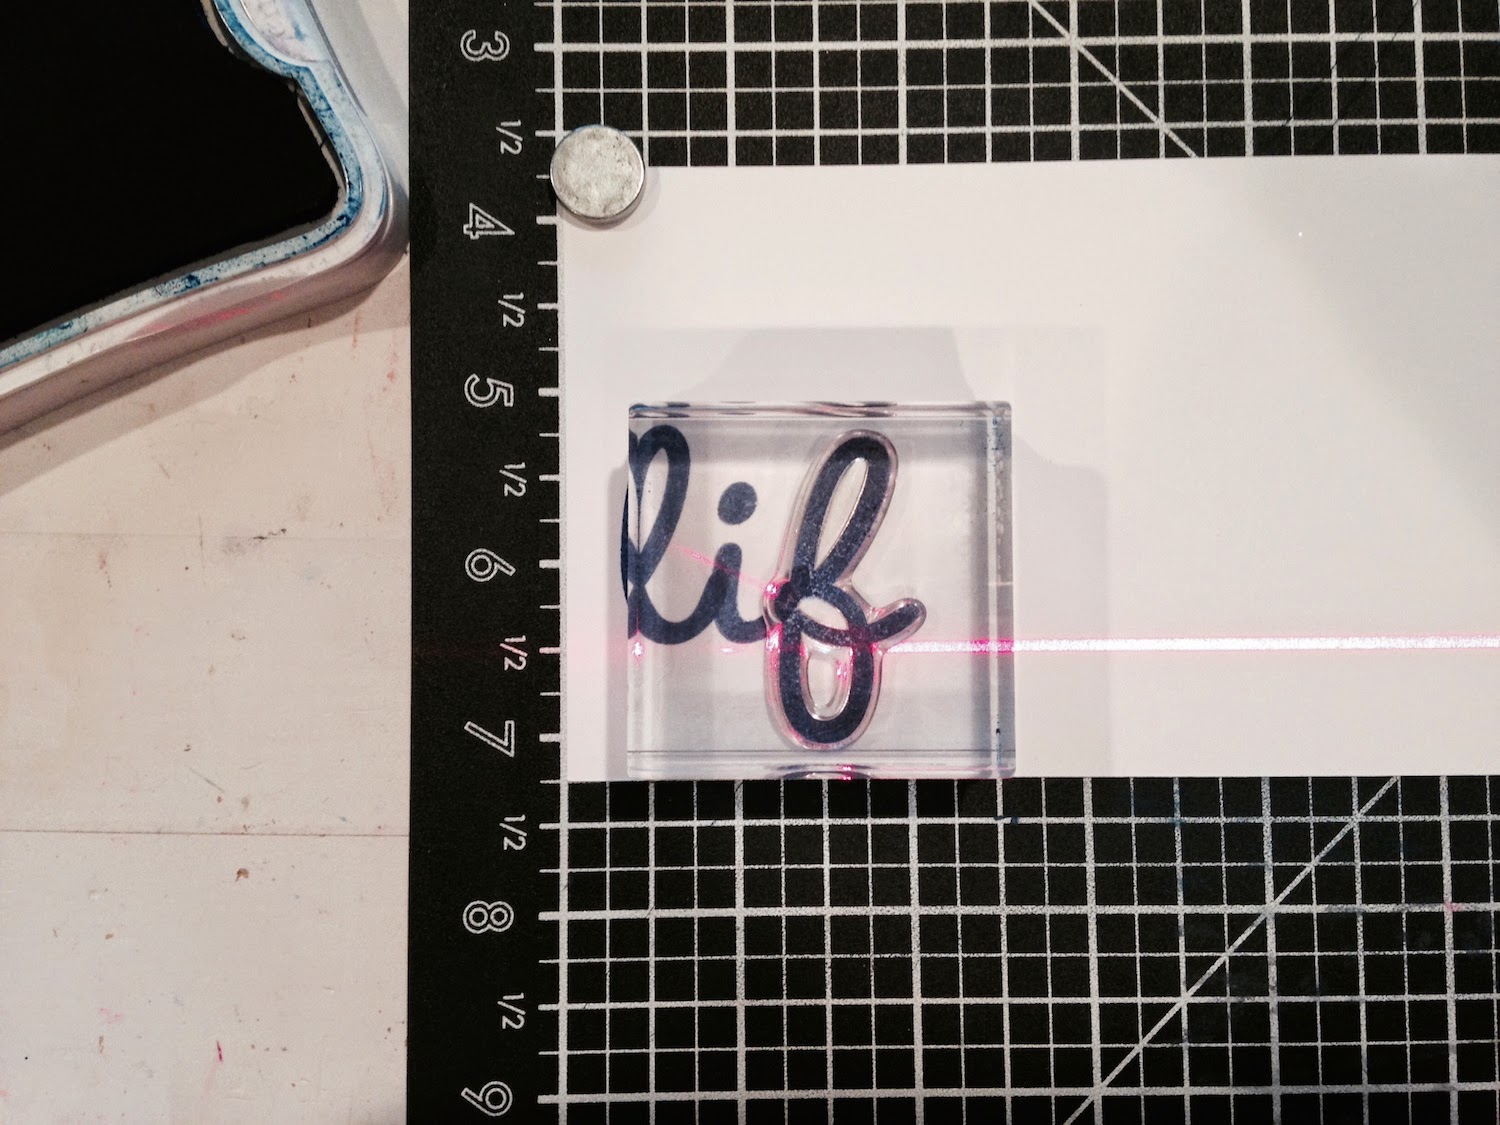
could never get them stamped straight. So, if I wasn't cutting out the letters and placing them individually, I wasn't stamping. With the Get-it-Straight™ Laser Square, I can stamp with confidence! I used scrap card stock, and held it in place with the magnets that come with the Multi-Mat™. Then, shine your laser and go to stamping. You can see the laser through your blocks when using clear stamps so placement is a breeze!

I stamped "life" and "little," then cut them out and set aside. I cut out the gears in different sizes on various patterned papers and card stocks using the Artiste Cricut cartridge. 

4) I cut a circle for the 'Work Hard Nap Hard' stamp and centered that circle on my Multi-Mat™ and held it in place with the magnets. Now, even though this stamp is on a wood block, you can still use the Get-it-Straight™ Laser Square to get it straight and centered. Knowing the center of your circle and the height of the stamp, you can place your laser half the height of the stamp down from the center of the circle and line the edge of the stamp with the laser line.


5) Now adhere your photos and mats together and tie your ribbons. Adhere the larger gears, followed by the photos and mats using your Get-it-Straight™ Laser Square to make sure they're straight! Then stamp the rest of the title. 


6) Pop dot 'life' and 'little' and using your Get-it-Straight™ Laser Square, adhere them in place. Then, shine a line about 3/4 inch from the bottom of page 2 and using a paper piercer pierce 3 holes for brads.


Turn page 1 on its side and do the same. Put in your brads and then place the remaining gears with Pop dots and you have a finished layout! 

Tuesday, October 15, 2013

EZ-De's Blog Hop with Clearsnap Day 2


Welcome to day 2 of our blog hop with Clearsnap, makers of fabulous inks, sprays, embossing powders and so much more!  The KellyCraft Design Team and Clearsnap Design Team will be showcasing KellyCraft's new line of EZ-De's Stamps paired with Clearsnap Inks....

With the holiday season rapidly approaching, my thoughts have turned to gift giving. While it may be a little early, if I don't get started now, I will never get it all done! I have made coasters in the past, and when I saw the EZ-De's by KellyCraft Flourish Alphabet stamps, I thought how perfect they were to make monogram coaster sets. And I love how the Crafter's ink works on all types of surfaces and that there are multiple colors to choose from.

Supplies used:
EZ-De's Flourish Alphabet stamp set
ColorBox Crafter's ink - Clearsnap
Life Is Good stamp set - Close To My Heart
Tumbled marble 4x4 tiles
Paste Finishing Wax - Minwax
Get-It-Straight Laser Square
Felt bumpers
Offray ribbon


 First, wipe the excess dust off of your tiles. Then stamp the flourishes. To get the lighter color, I use a technique I learned from my wonderful friend LaJeania Hicks. Ink your stamp then stamp on a scrap piece of paper to lighten the ink. How light you want the color determines how many times you stamp it on the scrap. I did it twice then stamped on the tile.


Next, using my Get-It-Straight Laser Square, 
I measured 1 & 1/4 inch from the bottom of the tile to stamp the K.
Once the ink is dry, waterproof the tiles by coating with finishing wax.


 After the wax is dry, buff the tile. It will give it mild sheen.


Next place self adhesive felt bumpers to the bottom of the tile and you have a coaster!


Repeat to make a set, place together and finish off with a nice bow.
 A thoughtful and beautiful personalized gift ready for giving! 
 
With all the colors of ink to choose from Plus the 
BRAND NEW Ann Butler colors above
(which have just been released today), 
an entire alphabet, 
plus you can use any stamps for the background, 
it's easy to personalize these coasters to anyone on your list.

Thursday, September 5, 2013

Jimbo Lojik Blogging with Clearsnap Day Four


Join us everyday this week while we blog right along with Clearsnap, makers of fabulous inks, sprays, embossing powders and so much more!  The KellyCraft Design Team and Clearsnap Design Team will be showcasing KellyCraft's new line of Jimbo Lojik Stamps paired with Clearsnap Inks....

Today is Day TWO and today's project is by Kristin Kelly

"Neater than socks on a chicken"

So, because I live in the same house as Jimbo, I hear Jimbo Lojik on a regular basis. It's so awesome to see those sayings come to life as stamps! So choosing one out of so many funny 'jimboisms' was a little difficult at first. Then I came across the "Socks on a chicken" and since our son loves chickens, it was the perfect choice. A great sentiment to let someone know how 'neat' you think they are in a simple card.

Supplies used:
Jimbo Lojik Stamp Set G - KellyCraft
Color Box Crafter's Ink - Bark
Get-It-Straight Laser Square - KellyCraft
Clementine Paper Pack - Close To My Heart
Adhesive - Pop Dots, Scotch, Glue Dots


           Be sure to visit the Clearsnap blog to see what they created with the new Jimbo Lojik Stamps!

Friday, June 21, 2013

Centering Banners with the Get-It-Straight Laser Square

Project by: Kristin Kelly

Time With Family scrapbook layout

Placing a banner using the KellyCraft Get-It-Straight Laser Square

Supplies:
Get-It-Straight Laser Square
Wood grain paper - DCWV
Florentine paper pack - Close To My Heart
Card stock - CTMH
Desert Sand Re-inker - CTMH
Stamps, ribbon, adhesive pearls - CTMH
Cricut machine
Plantin Schoolbook Cricut Cartridge
Adhesive - Glue Dots, Pop Dots, Scotch

I have a bad habit of leaving my pictures on my camera card for way too long. So when I finally got around to downloading pictures and saw the pictures we took this April at Washington On The Brazos State Park, I had to make a layout! I use my Laser Square with practically every project I do, but when I decided to put a banner on this layout, I knew my Laser Square was the perfect tool to help with the job! After putting together the bulk of my layout, I was ready to put on the banners.

So first, I needed to mark the center point for my banner. For the word 'Family', I was using the full width of my page, so I set my Laser Square at 6" to place the flags for the M and I. The words I used happened to have an even number of letters, so my center was between two letters. If the words had an odd number of letters, you would just place the flag for the middle letter at the center point.


Then, to get the remaining flags even with each other, I turned my Laser Square to shine the line horizontally across the page to align the top corners of the flags for the remaining letters.


Using the same technique, I placed the banner for the word 'Time' on the first page. Adding the remaining embellishments and pictures, and a family scrapbook layout is complete!


And while my banners weren't straight across, the Laser Square was crucial to getting them centered and even across the page! Yet another use for the Get-It-Straight Laser Square! Making scrapbooking quicker and easier and straight and even!

Sent from my iPad
Kristin Kelly

Wednesday, June 19, 2013

Saturday, May 4, 2013

Getting it Straight with Ann Butler's Unity Stamp Line Blog Hop

Created by: Kristin Kelly

A bright rainbow of colors! What a great way to put a smile on someone's face. And a colorful way to showcase a brand new stamp line by Ann Butler Designs for Unity Stamp Company. And the perfect tool to get all those triangles straight? The KellyCraft Get-It-Straight Laser Square!


Supplies:
KellyCraft Get-It-Straight Laser Square
Ann Butler Designs Stamps Unity Stamp Company
Buttoned Together stamp set (Close To My Heart)
Smoothie, Sunset, Creme Brûlée, Sweet Leaf, Lagoon and Gypsy ink pads (CTMH)
Solid cardstock, 1 sheet White Daisy, 1 sheet Lagoon (CTMH)
Rhinestone brad (CTMH)
Artiste Cricut cartridge
Adhesive (Glue Dots, Scotch)

Instructions:
1. Cut a piece of White Daisy card stock 5 3/4 x 9. Fold in half to create a 4 1/2 x 5 3/4 card.


2. Use your Get-It-Straight Laser Square to provide a guide line 2" from the top of the card and stamp the Ann Butler Designs triangles in a row across the card alternating point up, point down.


3. Then stamp each column of triangles using your Laser Square to get them straight. You can trim the bottom of your card if your stamps do not reach the edge.

4. Cut a strip of Lagoon card stock 4 1/2 x 3/4. Ink your edges with coordinating ink if desired and adhere just above the first row of triangles. Then cut the bow using the Artiste Cricut cartridge at 1". Ink edges, fold and secure with rhinestone brad.


5. To get the ink effect on the friendship stamp I just used my finger to place the coordinating inks from the triangles on the stamp. You could also use sponges to have less mess:) Stamp on the top of the card using your Laser Square to guide placement.

6. Finally, adhere the bow with Glue Dots, and you are done!

A simple, yet beautiful and colorful, card to brighten someone's day! Made quickly and easily with the awesome combination of Ann Butler Designs stamps and the Get-It-Straight Laser Square.

Be sure to follow the rest of the hop below to see more creative uses for the great stamps.....


and Check out this Great Sale going on now through
Monday May 6, 2013 at Midnight....
 

Monday, April 15, 2013

Welcome Kristin Kelly


We want to welcome Kristin Kelly to the Design Team of KellyCraft.....

Yes you may have noticed she has the same name as the company.....Kristin asked her husband Jimbo "If I can use a laser to get picture straight on the wall then I should be able to get them straight on my layouts".....thus the birth of the Get-It-Striaght Laser Square.

Kristin does the most amazing projects and we are excited to share them here with you.