 Debbie Sherman created this gorgeous Christmas layout with the help of her Get-it-Straight™ Laser Square - find Debbie's full instructions on her blog here.

Our mission is to bring you high quality innovative products to enhance your craft experience while providing excellent customer service! The Get-It-Straight™ Laser Square utilizes a patent-pending sliding laser design, allowing you to quickly and easily align multiple objects - perfect for scrapbooking, stamping, quilting, school projects & more. Our Multi-Mat™ works perfectly with the Laser Square. We also have unique stamping options with our Jimbo Logik™ & Duck Commander® stamps!
Showing posts with label layout. Show all posts
Showing posts with label layout. Show all posts
Sunday, December 14, 2014
Believe! Layout by Debbie Sherman
Debbie Sherman created this gorgeous Christmas layout with the help of her Get-it-Straight™ Laser Square - find Debbie's full instructions on her blog here.
Friday, November 28, 2014
Good Boots Ain't Cheap Layout by Debbie Sherman

Good Boots Ain't Cheap Layout
Designed by Debbie Sherman
 The Multi-Mat and Get-It-Straight Laser Square is the perfect tool for making sure your layouts are perfectly straight! I matted this layout with several mats to share with you how easy this is to line everything ups and get it straight even when you distress the edges of your mats. The mat is magnetic and it comes with 4 magnets to hold your layout in place while you work on it. What made me happy is that I can still stick to my style even though it's distressed, mixed media and a little shabby!
Materials:


KellyCraft™- Get-It-Straight™ Laser Square
- Jimbo Lojik™ Stamps - Set E
- Multi-Mat™
Black Stazon Ink and cleaner
Chalk Inke for inking distressed edges - brown
Trimmer
Acrylic stamping block
Scissors
Adhesives
Patterned Paper of choice
Paper distressor
Embellishments of choice
Modeling paste
Stencil of choice
Flowers
Coordinating sprays or mists
Gesso
Photo
1. I started this project by cutting 2 mats from patterned paper, snipping the bottoms to create a banner shape. Distress the edges and ink with chalk ink of choice I used brown. Next I outlined the area where my mats were going to be adhered and then added modeling paste using a stencil, around the outlined area, After the pasted dried I misted it with different coordinating mists.
 2. Lineup your first mat on your background sheet using the Multi-Mat and Get-It-Straight Laser Square. Adhere to background paper.
 3. Using the Get-It-Straight Laser Square and Jimbo Lojik Stamps, stamp your journaling onto a journaling card or paper of choice.
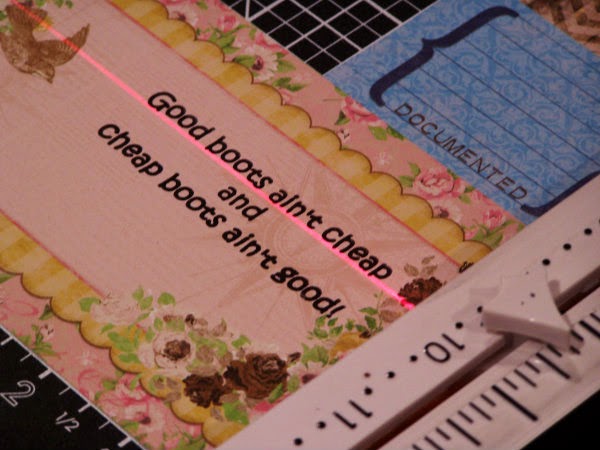 Lift the stamp and admire how straight the stamping is!
4. I added a piece of lace.
 5. I positioned the stamped journaling on my layout and adhered it. I layered some scraps around the journal tag.
6. I finished up with embellishments and some random background stamping and gessoed the flowers
Thanks for stopping by the KellyCraft blog today!!! - Debbie
Friday, November 14, 2014
"Classy, Sassy" Wedding Layout by Kristina Beagle

“Classy, Sassy” Wedding Layout
Designed By Kristina Beagle
I wanted a layout to showcase me and my best friend at her wedding. The photo booth was a huge hit. Silly photos, serious photos… I could fill a whole scrapbook! I wanted something elegant, yet a little racy, to show off our personalities in the photos.
Materials:

KellyCraft™ - Jimbo Lojik™ stamps - Set B
- Get-it-Straight™ Laser Square
- Multi-Mat™
Tsukineko® VersaMark® embossing pad
Hampton Art A La Mode Embossing Powder - Black
Silhouette® Cameo®
Paper trimmer, scissors, adhesive, foam dots, black ribbon, rhinestones, flower die cuts
Hampton Art A La Mode Embossing Powder - Black
Silhouette® Cameo®
Paper trimmer, scissors, adhesive, foam dots, black ribbon, rhinestones, flower die cuts
Instructions:
1) I always start by sketching out my layout, measuring and cutting all my main page elements, then matting everything where needed.
 2) Starting from the bottom up, I assembled the page elements on top of each other, using the Get-it-Straight™ Laser Square to align each piece. I started with a lighter, ivory 12" x 12" card stock and a 4” bolder pattern at the bottom, topped with a thin strip of another bold pattern, matted on black card stock to transition the two patterns, and topped with a strip of ribbon.

3) Next, on to the photos. Using the Get-it-Straight™ Laser Square, align the main page photo, also matted on black card stock, and adhere to the page. The secondary photos were made into a photo strip, I cut out a simple rectangle to size on the Silhouette, and adhered with pop dots.

4) I stamped my page title on to a Spellbinder's die cut with a KellyCraft™ Jimbo Lojik™ verse using VersaMark ink, heat embossed with black powder, aligned it with the Get-it-Straight™ Laser Square, and adhered it to the page.
5) To finish off the page I embellished with assorted rhinestones & die cuts.
5) To finish off the page I embellished with assorted rhinestones & die cuts.
Subscribe to:
Posts (Atom)