Hole in One
Designed by Candice Windham for KellyCraft
This summer, my sweet husband was able to check one more thing off his bucket list: he hit a hole in one on one of his favorite golf courses, Forest Hill, just outside of Memphis, Tennessee.
I wanted to create something that would honor his accomplishment, but decided to take it beyond a normal scrapbook page and frame it in a shadow box to hang in his golf-themed bathroom. That way, he’ll be reminded everyday that he scored the ultimate challenge in golf, one that has been accomplished by only a small number of people compared to the millions who enjoy this challenging game.
I called on two of my favorite tools, the KellyCraft™ Get-it-Straight™ Laser Square and the Multi-Mat™ Docking Station to line everything up, just the way Larry lines up his extraordinary golf shots. I also paid homage to the game by using a pattern that has been associated with golf since it’s beginnings in Scotland: argyle.
I know this supply list looks intimidating, but I pulled everything from my stash, which I have been trying to make a dent in all year.
Here’s how I did it.
Supplies:
- Duck Commander® Clear Polymer Stamps, Set 1
Cardstock, black, 4 ¼” x 2” oval; 3 ½” x 4 ¼” rectangle, 2 ½” x 3 ½” rectangle (Bazzill)
Cardstock, white, 8 ½” x 11” for printing titles and journaling, and one piece 3 ¼” x 4 ¼” (Bazzill)
Cardstock, light green, 12 “ x 12” (Bazzill)
Cardstock, orange, 8 “ x 2” and a scrap, approximately 2 ½” x 2 ½”(Bazzill)
Cardstock, brown patterned, 11 ½” x 11 ½” (Huckleberry Pond #HP102 Campers, Paper Loft)
Cardstock, argyle patterned, 11” x 11” (Nostalgic – Wistful, #NOS-222, Dream Street)
Cardstock, argyle patterned, 6” x 6”, 2” x 3 1/3” and 8” x 2 1/2"” (Unique Boutique, #UNI-237, Dream Street)
Cardstock, gray, 2 ½” circle (Bazzill)
Dye Inks, Black and Red
White pigment ink
Texture Fades Embossing Folders, Gridlock (Sizzix, Ellison)
Circle punch, 2 ½”
Corner rounder punch
Standard hole punch, ¼”
Golf tees, three
Rhinestones, 1/8” diameter (Horizon Group)
Crafter’s double-stick tape, ¼”
Hemp, natural, 18”
Shadow box, 12” x 12”
Large dimensional glue dots
Tools: Toothpick, craft knife, ruler, computer and printer
Instructions:
Note: Use the KellyCraft™ Get-it-Straight™ Laser Square any time you are lining up layers or making additions to the page that aren’t angled.
The Crafter’s Tape is used to adhere all the layers and Beacon 3-in-1 Adhesive is used with a toothpick to attach the rhinestones.
1. Adhere dark brown cardstock (Paper Loft) to solid green cardstock, centering the top layer over the
bottom. Set aside.

2. Print the title block and journaling block on white cardstock and trim. Sponge the edges of the 6” square of Dream Street Unique Boutique and mount the journaling block. Set aside
Ink the edges of the orange cardstock with red and black ink, then adhere the title block. Attach both to the 8 ½” x 2 ½” Dream Street Unique Boutique strip and sponge the edges with black ink. Set aside.
3. Line up and attach the black oval 4 ¼” from the top edge and ¼” from the right side of the Dream Street Nostalgic-Wistful sheet.

Place the page on the KellyCraft™ Multi-Mat™ and cut through the cardstock along
the entire bottom edge of the oval with a sharp craft knife.
5. Line up and attach the journaling block in the lower right corner of the Dream Street Nostalgic-Wistful sheet. Mount this sheet to the layered page from Step 1, centering.

6. Line up and mount the title block about ¼” from the left edge (on the solid green cardstock) and 2 ½” from the top edge of the layout.
7. Place the rhinestones in arcs across the top of the title block. When you get to the far right, bring your line straight down to the top of the black oval.
 Tip: I placed a basic line with about ½” of space between the rhinestones to get my rhinestone placement, then went back and added additional stones between the original ones for more bling.

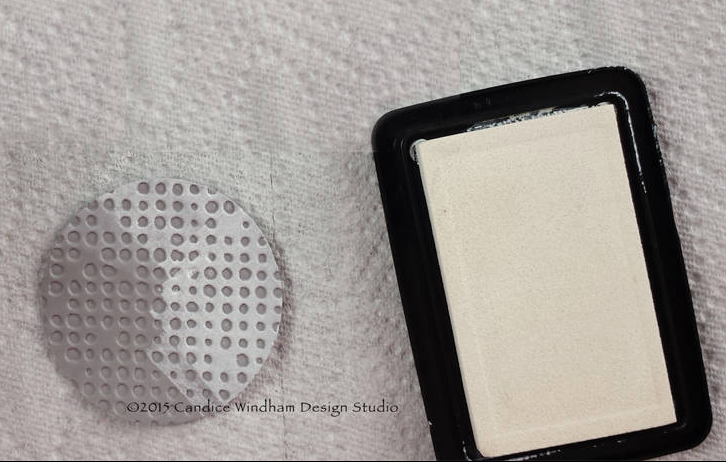
8. Run the gray 2 ½” circle through the Sizzix Big Shot with the Gridlock Texture Fades

embossing template. Turn the circle so that the circles are debossed, rather than embossed and press the white ink pad to the surface to color the golf ball surface, leaving the indentations gray.
Layer the 3 ¼” x 4 ¼” white cardstock scrap to the 3 ½” x 4 ½”
black tag. Attach the golf ball to the black and white tag, add journaling and slip it into the slit below the oval.
9. Punch the top corners of the 2 ½” x 3 ½” Unique Boutique and black cardstock and adhere the layers. Punch a ¼” circle near the top of the tag, add two pieces, 6” each, of hemp with a lark’s head knot, write the sentiment with a black permanent marker and adhere just below the black oval with large glue dots.
10. Stamp the Happy, Happy, Happy stamp on a white cardstock Happy, Happy, Happy layered tag and place over the end of the hemp.
scrap and layer it onto a scrap of orange cardstock. Adhere a 6” piece of hemp to the upper right back side of the layout page and bring it over the front of the layout page. Attach it straight down from the top of the page using a large glue dot. Add two more glue dots to the back of the
11. Add golf tees as desired with Beacon 3-in-1 Adhesive.
12. Place the layout in a 12” square shadow box and display it for all to see.


 Next step is to start layering on your mats for your photo.. I added several layers, you can add as many as you like or make it simple as you like.
 Thanks for stopping by the KellyCraft blog today!!!