

Our mission is to bring you high quality innovative products to enhance your craft experience while providing excellent customer service! The Get-It-Straight™ Laser Square utilizes a patent-pending sliding laser design, allowing you to quickly and easily align multiple objects - perfect for scrapbooking, stamping, quilting, school projects & more. Our Multi-Mat™ works perfectly with the Laser Square. We also have unique stamping options with our Jimbo Logik™ & Duck Commander® stamps!
Wednesday, December 31, 2014
Tuesday, December 30, 2014
"Family" Beach Layout by LaJeania Hicks

"Family" Layout
Created by: LaJeania Hicks
I love these family pictures that we took at the beach a couple of years ago. I wanted to create a one-page layout to that I could frame to put in our hallway. With the KellyCraft Get-It-Straight™ Laser Square and Multi-Mat™, I was able to get everything perfectly lined up to create this layout to showcase our family.
Materials:
KellyCraft™- Get-It-Straight™ Laser Square
- Multi-Mat™
Seaside Paper Pack – Close To My Heart (CTMH)
Footprints Stamp Set (CTMH)
Desert Sand Ink Pad (CTMH)
Solid cardstock, 2 sheets Desert Sand, 1 sheet Glacier, 1 sheet Colonial White (CTMH)
Burlap Ribbon (CTMH)
Artiste Cricut Cartridge (CTMH)
Adhesive (Glue Dots, Pop Dots, Scotch ATG)
Instructions:
 1. Cut the Blue Wood patterned paper at 11 ½”x11 ½”. Cut a piece of Desert Sand card stock at 5½ ” x 7 ½ ” and one piece at 11”x2”. Cut the Glacier Cardstock at 7 ¼”x 5 ¼” and a piece at 10 ½”x1 ¼”. Cricut cut the mats at 10” and 3” for Desert Sand; 9 ½” and 2 ¾” for Glacier; 9 ¼” for the Polka Dot patterned paper; and 2 ½” for the Colonial White Cardstock. Cricut cut the title at 2 ¾” in Desert Sand and Glacier. Cut the Ribbon at 10”. Dovetail one end of each cardstock strip and ribbon to make banners.
 3. Use your Get-It-Straight Laser Square to stamp the images on the Colonial White Cardstock using Desert Sand ink.
 4. Use your Get-It-Straight Laser Square to align:
- The mats to create layers.
- Attach the center mat.
- Turn my layout and perfectly align the banners.


- Attach the stamped mat and the title to the layout.

Using the KellyCraft Get-It-Straight Laser and MultiMat, I was able to quickly put together this layout and make sure that everything was perfectly aligned.
Monday, December 29, 2014
Classy, Sassy! Card by Monica Edwards

Sunday, December 28, 2014
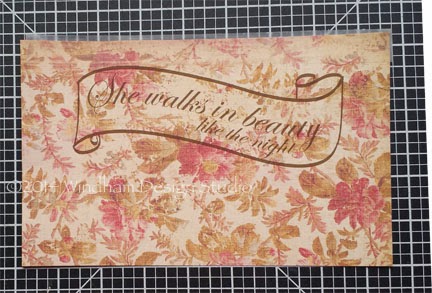
She Walks in Beauty by Candice Windham

She Walks in Beauty
Designed by Candice Windham
Lord Byron has been my favorite poet since I discovered him in English 101 at the University of Memphis. Not only was he a great poet, he was handsome as well. In fact, had I been alive in 1814, I would probably have camped out on his doorstep.
When I discovered the photo of this beautiful woman in an antique shop, my first thought was, “She walks in beauty, like the night,” and I knew I had to have her in my instant ancestors collection. I didn’t want to make a scrapbook page, but rather a piece of home décor art. I discovered her frame in a different antique shop and knew it would be perfect with a little crafty magic.
My KellyCraft™ Get-it-Straight™ Laser Square and Multi-Mat™ Docking Station turned this project into an easy-as-pie creation.
Materials:
KellyCraft™ - Get-it-Straight™ Laser Square
- Multi-Mat™
Assorted patterned card stock (Two matching sheets for the mat board cover; two more sheets or assorted paper scraps for the flowers
Photo printed on card stock
Banner printed from .pdf file on patterned paper scrap
Distress Ink, Walnut Stain and Vintage Photo (Tim Holtz for Ranger)
Wide lace strip (Simplicity)
Assorted Flower Dies (Spellbinders™)
Grand Calibur Die Cutting Machine (Spellbinders™)
Craft paint (DecoArt® Americana® Multi-Surface Metallic, Champagne)
Crème Wax (DecoArt® Americana Decor®, Deep Brown)
Masking tape or artist’s tape
Liquid Adhesive (Beacon® Zip Dry)
Double Stick Tape, 3” (Sookwang)
Pop dots
Dew Drops (The Robin’s Nest)
Tools: Sponge, scissors, brush, dusting sheet or soft towel, craft knife, mat cutter if you can cut your own mat
Instructions:
 Note: All die cuts are sponged on the edges with Walnut Stain and Vintage Photo inks.
Tip: Never use your original photos in pieces that will be exposed to light. They could fade completely away. Make a copy and store the original in a dark, cool, dry place.

Cover mat board with patterned paper or card stock. The paper I used had a script, which I was able to match up without trimming. However, I used my KellyCraft Get-it-Straight Laser Square to make sure I had the paper square on the mat board by lining up. here
 the top edge of the mat board and then lining up the script according to the mat board straight edge. I was correct in
thinking the script was a little off. The misalignment would be evident after the piece was finished. That would have driven me nuts. Insert
thinking the script was a little off. The misalignment would be evident after the piece was finished. That would have driven me nuts. Insert
Cut the window opening in the mat board. You can use a craft knife if you don’t want the bevel, or a mat cutter if you do. Position the photo in the opening and attach to the back with masking tape or artist’s tape.
Tip: Before attaching the patterned paper or card stock to the mat board, decide where the cuts will be for the opening. Make sure you have the tape covering all the edges for a smooth appearance after you cut it.
Place the mat board on the KellyCraft Multi Mat Docking Station and

 KellyCraft Get-it-Straight Laser Square. Measure ½” down from the top and turn on the laser light. Apply Beacon Zip Dry adhesive along the line, and then place the lace, being sure to line up the top
edge up with the laser line. It is much easier to apply the adhesive to the paper than to apply adhesive to the lace.
 the mat board, using the KellyCraft Get-it-Straight Laser square toi line up the first and last letters on the top line.
 Cut the flowers, sponge the edges and use Beacon Zip Dry adhesive to apply the flowers to the mat board. Use Zip Dry to add the Dew Drops.
Place the art in the frame, and then cut a piece of chipboard or mat board to place in the back. Add staples if needed.
This would look great on a wall, but I think I will place it on a tabletop easel.
We’ll have a pretty girl to look at, and I’ll be reminded of dreamy Lord Byron every time I see it.
Wishing you and yours a very merry Christmas and the best new year ever!
Candice
Thursday, December 25, 2014

Tuesday, December 23, 2014
Fear the Beard with the Duckmen - Card by Monica Edwards

Fear the Beard!
Designed by Monica Edwards
Hi everyone Monica here with a card I created using the KellyCraft™ Get-it-Straight™ Laser Square and Multi-Mat™, and a Duck Commander® stamp.
Materials:
- Multi-Mat™
- Duck Commander® Wood Stamp - Duck Men
Black ink pad
Close to my Heart - patterned paper in two different styles
Distressing Tool
Sewing Machine - to sew the edges
Paper trimmer

I cut a piece of solid card stock and fold in half to create card. I then cut a piece of patterned paper approximately 1/4" smaller on all sides than front of card, and cut another piece of patterned paper about 1" smaller than card front.
I cut a piece of patterned paper to serve as a mat for the Duck Men images.
I stamped the Fear the Beard verse and trimmed around the verse.
I then took my distressing tool and distressed the layers of patterned paper. I love how this came out and I would take a toothpick and curl the edges
Then I used my sewing machine and stitched the outer edge on the 2nd layer of patterned paper.
All the layers were mounted to the card front, using the Get-it-Straight™ Laser Square to align the first layer. The second piece was mounted unaligned as shown, as was the Duck Men and the Fear the Beard verse.
Friday, December 19, 2014
You're Classic Feather Card by Martha Lucia Gomez

Your'e Classic
Hi, I’m Martha Lucia and I have a very exciting project for you today! I created this card using the Get-it-Straight™ Laser Square.
Materials:
KellyCraft - Get-it-Straight™ Laser Square
- Multi-Mat™
- Jimbo Lojik™ Stamps Set A
Stamping Up - Card stock in two different colors, Calypso Coral and Very Vanilla
- Designer Series Paper (Victorian Parlour)
- Four Feathers & Framelits, Gorgeous Grunge stamp sets
- Classic Ink in several colors
Size Big Shot
Snail Adhesive
Dimensionals
Lawn Fawn Hemp Cord Pink Lemonade
Tuesday Morning Wood Button
1. I cut all the pieces to build my card. The size of the card is a regular size 5-1/2"x4-1/4". The second layer is 5-1/4"x4", the third is 4-7/8"x3-3/4" and the last one is 4-3/4"x3-5/8".
 Each square of the Designer Series Paper are 1"x1" and the squares of card stock are 1-1/8"x1-1/8".
2. Then I stamped the images of the feathers using three different colors of classic ink. I then cut them with the Framelits using the Big Shot.


4. For the third and fourth layer of my card I also used these tools. And after I mounted these parts I decorated the vanilla layer with a
stamped image to create a little background before mounting the little squares.
 5. Now is time to create the decorated squares and paste them over the base. This process was easy because I used the same laser line
to mount the six panels.
6. To decorate the principal panel, I used a hemp cord and a wood button tied around it. I pasted the
feathers over it with some Dimensionals. The last part of the card was the sentiment. I used the Jimbo Lojik™ Set A to stamp the verse using the laser square to align the stamping.


I hope you liked the project and come back soon for more inspiration!
Thursday, December 18, 2014
Duck Commander® Ornaments
 Creative Team member Cindi Bisson shared a fun idea for making ornaments with KellyCraft™ Duck Commander® stamps and Makin's Clay®. Find the instructions here on her blog.
 Wednesday, December 17, 2014
She Makes Dirty Words Sound Pretty Card by Cindi Bisson

Dirty Words Sound Pretty Card
by Cindi Bisson
Materials:

KellyCraft™ - Jimbo Lojik™ Stamp Set J
- Get-it-Straight™ Laser Square
- Multi-Mat™
Graphic 45® Domestic Goddess Collection
Light Blue, ivory parchment card stock
Westcott® Trim-Air Trimmer
Clearsnap® ColorBox® Archival Dye Ink - Suede
Self-adhesive pearl accents
Crochet lace
Beacon Adhesives™ Tacky Glue
Instructions:
1. Cut blue card stock to 7” x 8”, fold in half to create 8” tall card.
2. Cut patterned paper approximately 7 3/4” x 3 1/4”.
Cut goddess image from paper. Cut mat from blue card stock about 1/8” larger on all sides.
3. Ink verse stamp with Suede ink, using Get-it-Straight™ Laser Square to align, stamp onto ivory parchment card stock. Trim around verse. Cut blue card stock mat for verse approximately 1/8” larger on all sides.
4. Ink edges of all pieces with Suede ink.

5. Mount patterned paper to center of card front, using Get-it-Straight™ Laser Square to align straightly 1/8" from edges.
 6. Mount crochet lace along right opening edge of card front, overlapping edge of patterned paper.
  7. Use Get-it-Straight™ Laser Square to align and mount Goddess image approximately 1/2” from bottom of card and approximately 1” from left edge.
8. Mount verse, centered, onto mat, using Laser Square to align, then mount on card front approximately 1/4" from left edge and approximately 1" from bottom of card.
 9. Add self-adhesive pearl accents to corners of verse
Monday, December 15, 2014
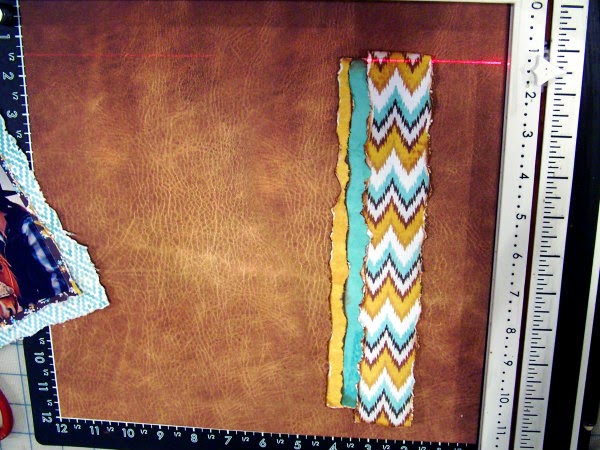
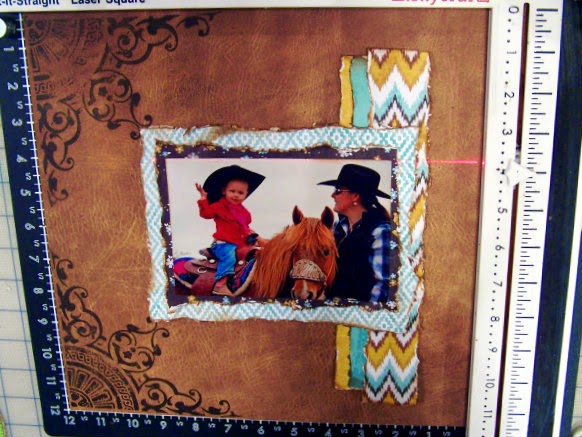
Country Girl Cowgirl Layout by Debbie Sherman
Hi everyone! Debbie with you today to share a layout about a cute little cowgirl I know.I created this layout using the Multi-Mat, Get -It-Straight Laser Square and Jimbo Lojik Stamps. The more I work with these products the more fun I have! The stamps add a little humor to projects and make them fun. How many layouts do you create that are too serious?

The Multi-Mat and Get-It-Straight Laser Square allow for perfectly stamped text on your layouts, no more worrying about fixing mistakes with embellishments or even throwing layouts away.

What makes me happy is that I can stay with my style even though it's a little distressed, mixed media and shabby.
Here's a few of the supplies I used to create this layout.
Jimbo Lojik Stamps
Multi-Mat
Get-It-Straight Laser Square
Black Stazon Ink and Cleaner
Chalk Ink for inking distressed edges - brown
Trimmer
Scissors
Adhesives
Patterned Paper of Choice
Paper Distressor
Embellishments of choice
Flowers
Coordinating sprays or mists
Photo
Directions
Cut 2 mats and 3 strips from patterned paper. Distress the edges and ink with chalk ink of choice.
Outline the area where the mats are going to be adhered.
Line the 3 strips up on background sheet using the Multi-Mat and the Get-It-Straight Laser Square.
 Stamp the Corners with a large Decorative Stamp.
Distress the edges of the 2 mats you cut earlier, ink the edges and adhere your photo. Adhere these to your background sheet using the Multi-Mat and Get-It-Straight Laser Square.

 Adhere your journaling tag to your layout and embellish.


I added a banner to the layout also from the patterned paper scraps.
.jpg) Finish up with embellishments and a few splatters with coordinating mists.
Finish up with embellishments and a few splatters with coordinating mists.
 Hope you enjoyed this layout and thanks for stopping by the KellyCraft blog today!
Debbie
The Multi-Mat and Get-It-Straight Laser Square allow for perfectly stamped text on your layouts, no more worrying about fixing mistakes with embellishments or even throwing layouts away.
What makes me happy is that I can stay with my style even though it's a little distressed, mixed media and shabby.
Here's a few of the supplies I used to create this layout.
Jimbo Lojik Stamps
Multi-Mat
Get-It-Straight Laser Square
Black Stazon Ink and Cleaner
Chalk Ink for inking distressed edges - brown
Trimmer
Scissors
Adhesives
Patterned Paper of Choice
Paper Distressor
Embellishments of choice
Flowers
Coordinating sprays or mists
Photo
Directions
Cut 2 mats and 3 strips from patterned paper. Distress the edges and ink with chalk ink of choice.
Outline the area where the mats are going to be adhered.
Line the 3 strips up on background sheet using the Multi-Mat and the Get-It-Straight Laser Square.
Distress the edges of the 2 mats you cut earlier, ink the edges and adhere your photo. Adhere these to your background sheet using the Multi-Mat and Get-It-Straight Laser Square.
Using the Get-It-Straight Laser Square and Jimbo Lojik Stamps, Stamp your journaling onto a journaling card or paper of choice. (I die cut 2 from different sized dies and colors)
I added a banner to the layout also from the patterned paper scraps.
Debbie
Sunday, December 14, 2014
Believe! Layout by Debbie Sherman
 Debbie Sherman created this gorgeous Christmas layout with the help of her Get-it-Straight™ Laser Square - find Debbie's full instructions on her blog here.
Saturday, December 13, 2014
I Could be a Morning Person Mug Card by Martha Lucia Gomez
 Creative Team member Martha Lucia Gomez created another fun card with this great Jimbo Lojik stamp - You can find the full instructions here on her blog.
verse.
Friday, December 12, 2014
A Baby in a Stocking!?! Layout by Kristina Beagle

Thursday, December 11, 2014
Faith, Family Ducks Christmas Card by Candice Windham
 |
Uncle Si - the CHRISTMAS GUY! LOVE this card by Creative Team member Candice Lee Windham! Made with #KellyCraft#DuckCommander® stamps and our Get-it-Straight™ Laser Square! Find Candice's full instructions here -http://windhamdesign.blogspot.com/2014/12/a-duck-commander-christmas.html
Subscribe to:
Posts (Atom)