Friday, March 29, 2013

Mini ART Quilt with the Laser Square

While at the CHA Winter Show in January I taught a Demo-nar (Seminar/Workshop) where we created a mini ART Quilt


using my new line of stamps from Unity Stamp Company , the Get-It-Straight Laser Square from KellyCraft Innovations, Trims from Expo International, stamp pads from Clearsnap, threads from Kreinik, fabric glue from Beacon Adhesives, buttons from Buttons, Galore and More , hangers from VELCRO® and no bake clay from Makin's.


To create I used the Get-It-Straight Laser Square 
to help line up the triangle stamps.


to stamp out my design....

which is the "Flying Geese" pattern in quilting, getting it lined up
and straight was easy with the Get-It-Straight Laser Square.
Once you have your images stamped....

  • Place fabric on top of batting and backing fabric and quilt around flying geese pattern.
  • Arrange die cut flowers, buttons, clay buttons, word, and trims in a pleasing manner then sew or glue into place
  • Stitch a running stitch around outside edge of quilt.
Have fun and be creative!

Wednesday, March 27, 2013

Unity Stamp Line

I have a new line of Rubber Stamps from Unity Stamp Company that work perfectly with the Get-It-Straight Laser Square.

This line of rubber stamps (one set is pictured above) are basic shapes such as squares and triangles which are perfect to combine to create backgrounds and patterns.  Using the KellyCraft Get-It-Straight Laser Square makes it easy to keep all of the shapes lined up....


I decided to use one color of ink for this card front so I wanted to assemble my stamps onto the acrylic block, I used my Laser Square to line everything up.


I placed my laser square on top of my card stock, inked up my stamp 
and lined it up to stamp the first image.


I continued stamping and lining up 

 until I had 4 stamped images.


I created a pinwheel design.

Then added a stamped edge to the outside to finish it off; it is now ready to become a card front!
Quick and easy with the Get-It-Straight Laser Square!

Monday, March 25, 2013

Deceiving the Eye


We took a short trip to Biloxi, Mississippi on the Gulf coast last year, and I went absolutely crazy taking photos at the Jefferson Davis home. This home sits on a small knoll overlooking the Gulf, with a nice, wide verandah and lots of rocking chairs. While we waited for our tour guide, I snapped lots of pics of the view from the porch as well as a lot of the surrounding flowers. I was almost sad when we had to follow our group into the house, but I had no idea of the treasure trove I would find inside.

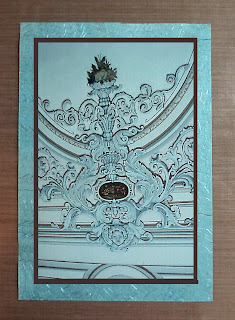
This home has been restored to it's former grandeur, after surviving several hurricanes, including Camille and Katrina. The furnishings are fabulous, but the trompe l'oeil decor on the walls and ceilings is a show-stopper!

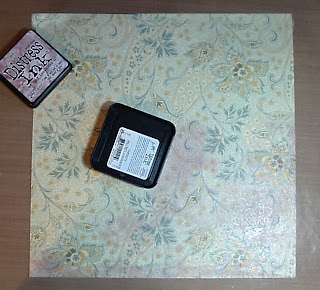
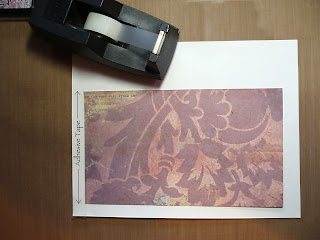
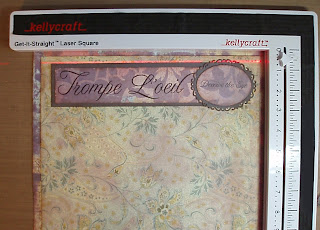
Trompe l'oeil translates as deceiving the eye, and this representation definitely does it. The scrolls and flourishes as well as the recessed areas look like cast plaster, but those walls are definitely flat. I wanted to create a scrapbook page that would showcase this beautiful work. I knew I wanted to use large photos with hidden journaling, muted colors and one of my new Spellbinders dies. While searching through my paper stash for the perfect prints, I happened across a small sheet of pale blue/green mulberry paper and knew I had to use it. I wanted torn edges, but keeping everything straight with not one, but three pieces of torn paper is a challenge. The KellyCraft Get-it-Straight Laser Square saved the day.

Mulberry paper does not tear in a straight line, so alignment is chancy at best, and if you aren't going to tear it to show off the beautiful fibers, there's no sense in going to the extra expense. The solution is to line up the edges of the layered photos with the edge, of the printed paper, not the mulberry paper.

Here's how I did it:

Materials
KellyCraft Get-it-Straight Laser Square
Printed paper or card stock, 2 complimentary sheets, 12" x 12" (Cosmo Cricket and Anna Griffin)
Brown cardstock, 12" x 12", (Stampin'Up!® Chocolate Chip)
Oval die cut (Spellbinders Nestabilities 'Floral Ovals' Metal Dies )
Die Cutting Machine (Spellbinders Grand Calibur)
Pearl Pen, Light Green (Viva Décor)
Ink, Chestnut Roan, (Colorbox Chalk Ink)
Lavender ink pad (Tim Holtz Distress Ink pad, Milled Lavender)
Punches, Corner Rounder and Scalloped Oval (Stampin'Up!®)
Scissors
Double sided adhesive (Kool Tak Premium Extreme, 3/8")

Instructions
-->  1. Begin by cutting the center from the background paper, leaving a 1 1/2" border all around.(The center portion will be used for the headlines, subhead and journaling tag.) Ink all outer edges with  Chestnut Roan ink.

2. Trim the second sheet of  printed paper to 11 1/4" x 11 1/4" and ink the outer edges with Chestnut Roan ink. Since the second background paper had very little lavender color, I swiped the Milled Lavender Distress Ink in a circular motion all over the page.


3. Print your photos and layer them onto brown card stock. Ink edges of both photos and card stock with Chestnut Roan ink.

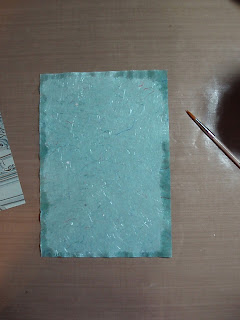
Wet edges with clear water.
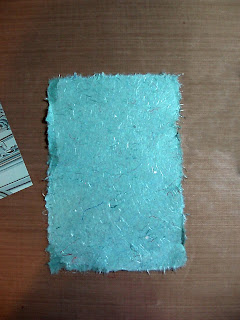
Pull paper at a 90° angle from the edges.


5. Print headlines and sub heads on the paper that was left in step 1. You may have to split it into two pieces to get the alignment you need:
  • Print your heads and subheads onto white copy paper. Line the printed paper up onto the copy paper, placing it so that it covers the print area. Be sure to leave some extra space around the words. Tape the leading edge (the one that goes into the printer) down. Replace the taped paper in your printer and print again. Your heads and subheads will print out onto the printed paper, ready for trimming.
  • If you have trouble lining up the printed words and don't have a light box, hold the papers up against a window pane. You should be able to see through the printed paper enough to get the proper alignment.
6. Line up your oval Spellbinders die over the top subhead and cut. Cut an additional piece from brown card stock. Trim the printed paper along the dotted impression and layer it onto the brown cutout.

7. Trim the headline and place it onto a layer of brown card stock with a 3/16" border all around. Adhere the oval die cut subhead to the right side.

8. Place the KellyCraft Get-it-Straight Laser Square on your work surface. Line up the lower background piece in the corner of the Laser Square. Turn on the laser light and attach the top background paper 3/8" from the edge all around.


9. Place the headline piece approximately 3/8" from the top of the upper background piece.

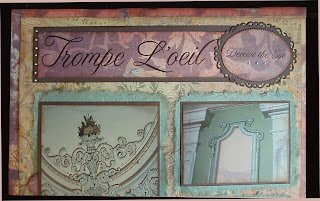
10. Align the largest photo approximately 3/4"below the headline block. Align one of the small photos horizontally with the largest photo and adhere in place. Align the second small vertically with the other small photo.

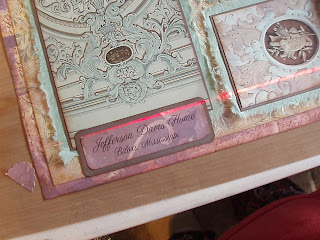
11. Trim subtitle block. Trim a piece of brown card stock 3/8" larger on both sides than the subtitle block and use corner rounder on both pieces. Align with the KellyCraft Get-it-Straight Laser Square and adhere in place.
-->
12. Print journaling on matching card stock, Use a scrap of one of your printed papers to cut a piece of the small scalloped edged oval punch. Ink edges and adhere to journaling block. Slip it between the photo/card stock layer and the mulberry papers.

13. Apply Viva Décor Pearl Pen to title block.


 Now, instead of a stack of photos that are shoved in a drawer, just waiting for someone to dump them when I'm gone, they are showcased on this page with an explanation of why I love them so much. This will go into my "...a few of my favorite things..." album. I think my next entry in that album will be a page about why I love my KellyCraft Get-it-Straight Laser Square!

Maybe today is the day for you to begin recording your favorite things.

Thursday, March 21, 2013

Personalizing your Laser Square

LaserSkin - Camo


Did you know that you can personalize your Get-It-Straight Laser Square with Laser Skins?

They come 3 to a package and there are 5 themes to choose from so you are sure to fine just the one that is right for you......

Camo, Giraffe,  Jungle, Leopard and Paisley
LaserSkin - GiraffeLaserSkin - Jungle Natural PatternsLaserSkin - LeopardLaserSkin - Paisley

How easy is it?


Peel off you current Laser Skin

Choose which your new Laser Skin;
which is the hardest part :)


Peel the protective backing off
and place onto your Laser Square


Repet for the other side,

and you are done....
that quick and easy.....

Tuesday, March 19, 2013

Wednesday, March 13, 2013

Adding a lift

A while ago we shared how to add height to your Get-It-Straight Laser Square when needed for stamping which you can check out here. today I want to show you how to add height to line up stamps on a clear acrylic block:


I simply placed blocks beneath my laser square the same height as my acrylic block so that the laser light would show up on the block while placing the stamps in place.  Quick and Easy!

Monday, March 11, 2013

My Sweet Friend Card

Created by Lisa Rojas, Stampin' Queen Creations
Give The Queen A Call!

These new stamps from JustRite Clear rubber stamps are fabulous! I really liked working with them on this card. If you join me here every month, I will try to bring you cards that are anything but ordinary. I love putting time into my cards by layering, lots of embellishments, different shapes, cards that move, etc.

Every once in a while, I'll show you how to make a card fast and easy, but if you're looking for cards that are different and detailed, you've come to the right place. And of course to create these types of cards, your life will be some much easier if you add my favorite tool to YOUR toolbox...the Get-it-Straight Laser Square by KellyCraft.


My Sweet Friend Card


Supplies

Foam Tape
Double Sided Tape
Buttons (2)
Instructions
Trace both pattern pieces on cardstock

 The Get-it-Straight Laser Square is also a great tool for scoring.
Use it to score both sides of the outside card.
Stamp outside of card with Mudslide inkpad. Cut three pieces
of cardstock (2) at 2 3/8"W x 1 7/8"H and (1) at
2 1/4"W x 1 3/4'. Stamp butterflies on larger pieces. Stamp
"Special Friend" on smaller piece.
Color all stamped images with chalk pencils

Using the Get-it-Straight Laser Square, stamp inside of
the card with Mudslide inkpad.

Color the stamped images with chalk pencils. Adhere outside
of the card together with double sided tape.

Adhere butterflies and "Special Friend" to card front
with foam tape, using Get-it-Straight Laser Square
for placement.

Adhere buttons to inside of card with
double sided tape. Ink all the edges of the card
with Mudslide inkpad.

Finished card.

Thursday, March 7, 2013

Mosaic Canvas

Project by: Ann Butler

I thought I would share a Mosaic Canvas I created using the KellyCraft Get-It-Straight Laser Square


and my new Stamp Line from Unity Stamp Company.  You will find complete instructions on how to create this project in the New issue of Bella Crafts Quarterly which is a FREE downloadable digital magazine.

Tuesday, March 5, 2013

"Welcome" Wall Plaque


The KellyCraft Get-it-Straight Laser Square made aligning all the components of this mixed-media “Welcome” wall plaque easy.  It’s perfect when working with ribbon, text, stamped images, buttons and more.


by
Cindi Bisson, Behind These Eyes™

Materials:

KellyCraft Get-it-Straight Laser Square
Oval paper mache wall plaque
Chipboard lettering
Black acrylic paint
Ann Butler Designs Stamp Sets by Unity Stamp Co.  - 1" Doily Picnic, 1" Leaves All Over, 1" Stripes. Dots. Hearts.
ClearSnap Crafter’s Ink - Night
Beacon Adhesives Felt Glue
Vintage crochet trim
Black cardstock
Book pages
Paint brush
Westcott Titanium-Bonded Non-Stick scissors

Instructions:

Apply Beacon Felt Glue to entire surface and sides of oval paper mache plaque.   Apply pieces of book pages randomly to cover surface.  Repeat on back.


Paint chipboard lettering to spell out “WELCOME” with black acrylic paint.  Let dry.

Create 3 different house shaped images using stamps.   Ink with Night Crafter’s Ink and stamp onto book pages.  


Cut out each house image, mount onto black cardstock, trim around each house to create black mat.

Use Get-it-Straight Laser Square to align vintage crochet trim on bottom third of plaque and mount.


Use Get-it-Straight Laser Square to align stamped houses, evenly spaced, over crochet trim and mount.

Use Get-it-Straight Laser Square to align painted chipboard lettering.  Mount.


Add strip of crochet trim to hang plaque.  Use Get-it-Straight Laser Square to align buttons over stamped houses.  Mount.