Monday, December 31, 2012

Daddy's Girl

This quick and easy layout is simple, but tells the story. 
I ran across this photo a few days ago (I had an attack of get my computer files in order for 2013). It always makes me smile. The photo was made on Christmas Eve around 1956 at my Aunt Ola's home. I know Daddy must have worked all day, had just had a big Christmas dinner and was exhausted. I, on the other hand, was wide awake and ready to open presents!

Daddy loved Christmas, and this photo reminds me of all the things we loved. Because of space limitations, I couldn't list them all. I'm thinking I need to go back and add "..Just a few of.." to the beginning of that list, because we had so many things that we both loved and both loved to do (I'll save my first experience on the golf course at age 6 for a later posting).

Sometimes when we wait until we have all the right papers, a new bottle of glue or tape dispenser, the perfect embellishments, we miss the joy of preserving the memory. When you forget the little things, they are lost forever. The moral of this meandering thought? Forget about having the perfect everything and just get the memory down. If you want to add bling and more embellishments later, you can. We are not guaranteed that there will be a tomorrow. If you are the only person left with the memory of the photo's importance, it's up to you to record that memory. I'll step down off my soapbox now,

This page is an example of Down n' Dirty scrapbooking, and having the Get It Straight Laser Square from KellyCraft makes it so quick and easy. I printed out my page elements, trimmed them to size and then layered them all onto black cardstock, using the Get It Straight Laser Square to align the elements. Once this was done, it took less than 7 minutes to put this page together, and I was able to add an element of surprise (the angled bullets) easily, just by turning the orientation of my page in relation to the Get It Straight Laser Square.

TIP: If you design your page in a computer drawing program on a 12 X 12 layout, you can size your photos and journaling perfectly. Once you are happy with it, just change the page size to 8 1/2" x 11" (unless you are lucky enough to have a 12" printer) and place each element on the smaller pages to print. If you're making a smaller page, you can print the entire thing on one piece of cardstock.
Here's how I did it:
Supplies
Get It Straight Laser Square from KellyCraft
Bo Bunny 12 x 12 cardstock
Black cardstock, 8 1/2 X 11, 3 sheets
Cream cardstock, 2 sheets
Beacon ZipDry Adhesive
Want2Scrap Say It with Bling swirls and rhinestones

Assembly
1. Create headline and journaling on computer. Print journaling and the photo on cream cardstock and trim each piece.

2. Using the KellyCraft Get It Straight Laser Square, line up each element on black cardstock and trim.
Line up tags on black cardstock.


3. Using the KellyCraft Get It Straight Laser Square, place headline and photo on 12 X 12 cardstock.
Place headline and photo on page.


4. Turn the entire page to approximately 45° to the left. Use this orientation to place all the bullet journaling.
Turn page and use the beam to decide where to add your bullet tags.


Tip: Use repositionable adhesive to hold the page in place while to add the bullet points.

5. Add bling as desired.

It took me longer to write the directions than it did to create the page from start to finish.

What are your favorite childhood memories? Record them now so your children and their children will know what it was like in the "olden days" (My dad always laughed when I asked him about the olden days.).

Now, go hug someone you love and maybe make a scrapbook page about it.


Thursday, December 27, 2012

Tuesday, December 25, 2012

Friday, December 21, 2012

"Merry Christmas" Card


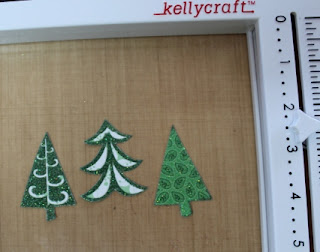
I was looking through my big stack of Christmas cardstock and found this great tree pattern and knew  it was perfect for a card. 


"Merry Christmas" Card 
 
Beacon Adhesives - Zip Dry
Card stock: White, Green
Decorative Card stock with Trees from Die Cuts with a View
Scissor, Ruler, Foam Squares

 Print out "Merry Christmas" onto white card stock 
using the Duetica Lettering System with
Mandolyn font in size 72 with green ink;
  Trim it to 4 3/4" x 3 1/2". 

 Cut the following:
White card stock 5 1/2" x 4 1/4" 
Green card stock 5 1/4" x 4".
decorative card stock 5" x 3 3/4"


Cut out some trees from decorative card stock, set aside.
 

Using your Laser Square  line up the green card stock on top of the white
glue into place.


Then using your Laser Square  line up the decorative card stock 
on top of the green and glue in place.

  
. Add the printed "Merry Christmas" to the top of the printed card stock
and glue into place.
Then add the trees using the laser square to place them 
exactly where you want, adding foam squares to give them height as needed.

Wednesday, December 19, 2012

Use your Laser Square to score your cardstock!

Tip by  Lisa Rojas, Stampin' Queen Creations
Give The Queen A Call!!!

Tip: Did you know that you can use your
Get-it-Staight Laser Sqaure to score your cardstock?


Cut cardstock desired size.
Use Get-it-Staight Laser Sqaure as a guide to mark your score line.
So easy!

Monday, December 17, 2012

Adding Height to you Laser Square

Tip by  Lisa Rojas, Stampin' Queen Creations
Give The Queen A Call!!!


Add some stamping blocks under your laser square to give it height when working on Mixed Media projects!

Thursday, December 13, 2012

"Merry Christmas" Card

Created by Lisa Rojas, Stampin' Queen Creations
Give The Queen A Call!!!

Hi Everyone,

With the holidays being right around the corner, I thought I would share a holiday card with you. I started out as a designer creating cards and I love it, especially now that I have the KellyCraft Laser Square in my tool box!

I did not create this card to be an easy mass production card where you can sit down and create 30 of them in one night. This card will take you a little bit longer to create but it's well worth the time you spend making it. This is the type of card that your recipient is going to want to save and cherish for a very long time. This type of card is my very favorite to create and I hope you'll love it too!

"Merry Christmas" Card
 
 
Supplies
 
Green, Burgundy & Cream Cardstock
Holiday Themed Pattern Paper
Me & My Big Ideas Holiday Stickers
Cream & Burgundy Trims
Beacon Adhesives Zip Dry Paper Glue
Foam Tape
Gamsol Mineral Spirits
Blending Stump
Clearsnap ColorBox Dye Inkpad- Red Devil
Clearsnap Smooch Top Coat- Moonlight
Clearsnap Glitter- Winter Frost
Marvy Uchida Snow Marker
Stampabilities Vintage Santa
Heat Tool
Scissor

Instructions


Using Red Devil inkpad, stamp santa on white cardstock,
trim with scissors
 
 
Color image with color pencils and blend colors with Gamsol
and blending stump. Apply Smooch to santa's beard. 
 
 
Apply glue to beard and sprinkle on glitter. Add Snow Marker
to hat and use heat tool to set. 
 
Tip: Did you know that you can use your
Get-it-Staight Laser Sqaure to score your cardstock?
 
Cut green cardstock 7"W x 11"H.
Use Get-it-Staight Laser Sqaure score at 5 1/2".
Fold card base at score line.
 
 
Cut cardstock- For card front cut burgundy cardstock
6 3/4"W x 5 1/4"H. Pattern paper 6 1/2"W x 5"H
For inside card cut burgundy cardstock 6 3/4"W x 5 1/4"H
Pattern paper 6 1/2"W x 5"H. For Santa cut burgundy
cardstock 3 1/4"W x 4 3/4"H. Green carstock
3"W x 4 1/2"H
 
 
Use Get-it-Straight Laser Square to layer all cardstock pieces
 
 
Fold card front in half


Cut burgundy cardstock 4 1/2"W x 3 1/2"H and green
cardstock 4 1/4"W x 3 1/4"H.
Use  Get-it-Straight Laser Square  to line up stickers


Adhere cardstock and pattern paper to inside of card
with Beacon Adhesives Zip Dry Paper Glue.
Use Get-it-Straight Laser Square to line up trims.
Adhere to inside card base.
 
 
Repeat last step to card front. Adhere santa image to
front of card.
 
 
Finsih card by applying the remainder of the
stickers with glue. For "Merry Christmas" piece,
adhere foam tape to back to give it some height.
 Use picture if needed for placement.


Tuesday, December 11, 2012

Get-It-Straight Laser Square available on Amazon

 The Get-It-Straight Laser Square is now available on Amazon check it out here!


Order now and you will get it in time for Christmas.  They have FREE shipping available right now!

Friday, December 7, 2012

Countdown Calendar Tee shirt

Check out Cindi Bisson's Simple Solution for creating a Countdown Calendar Tee Shirt


Using the Get-It-Straight Laser Square


She was able to get the gird straight for the calendar.....

You can find all of the instructions for creating this cute Christmas Countdown Tee Shirt in Cindi's Simple Soulutions Column of the When Creativity Knocks Newsletter

Wednesday, December 5, 2012

Festive Thank You Card

When you are making your holiday cards this year don't forget to make a few holiday "Thank You" cards too! Here's my simple and sweet version using the popular houndstooth pattern and some buttons!

 
Materials and Tools


Directions
  • Cut scrapbook paper in half and fold into a 6x6 square card
  • Cut a strip of green paper 1.5 wide by 6 long 
  • Line green strip strip of paper in the middle of the card and glue down
  • Stamp "thank you" onto scrap piece of card stock (no need to line up here) and cut out
  • Line up "thank you" paper in the middle of the green strip and glue down
  • Add buttons to your liking
  • Glue a 4x5 inch piece of creme card stock inside of the card. 


Done! Project by Andrea Currie

Monday, December 3, 2012

“A Winter’s Day” Mixed-Media Canvas with the Get-it-Straight Laser Square


Aligning the many elements on this mixed-media canvas home-decor piece was easy thanks to the Get-it-Straight™ Laser Square !

by
Cindi Bisson, Behind These Eyes


Materials:

Get-it-Straight™ Laser Square
6” x 6” Canvas
TaDa Creative Studios Frozen Tozen patterned papers
Plaid Martha Stewart “Aquarium” Pearl and “Surf” Satin Acrylic paint
Clearsnap Cat’s Eye ink pad - Chestnut
Epiphany Crafts Shape Studio Tool Round 25, Metal Charms Round 25, Bubble Caps Round 25
ScraPerfect The Best Glue Ever
Making Memories round metal lettering
Wooden alphabet tile lettering
Assorted sticker lettering, alphabet rubber stamps
JudiKin’s Diamond Glaze, Ice Clear Roxs Glitter
The Twinery Cappuccino twine


Paint a 6” x 6” canvas with Martha Stewart “Aquarium” Pearl Acrylic paint.


Select random types of lettering, metallic, scrabble tile, stickers, etc. and coordinating patterned papers for project.

Cut focal bird image from patterned paper.  Set aside.

Use Get-it-Straight™ Laser Square to align words on pieces of patterned papers.


Apply Surf satin paint to rubber stamp lettering, use Get-it-Straight™ Laser Square
to align when stamping on patterned paper.

Ink edges of word pieces and bird image with chestnut brown ink. 

Arrange on canvas.   Add additional strips of coordinating paper, with edges inked, in open areas around border of frame as desired. 

Fold foam tape over 3 times, place onto back of focal bird image and mount slightly off center on canvas.

Use Get-it-Straight™ Laser Square to align wooden tile letters as shown.

Use Best Glue Ever to spell out “Brrr” on piece of patterned paper.    Add Roxs glitter to wet glue.  Add small amount of glue to top of paint stamped lettering, add glitter.  Let dry.

Cut three pieces of twine approximately 4”.  Mount one piece, tucked beneath patterned paper, approximately 1” from each outside edge.  Use Get-it-Straight™ Laser Square to determine center of canvas, add third piece of twine.   Spell out “cool” with stickers and mount so sticker covers end of twine in center of canvas.

Apply a coat of Diamond Glaze over “cool” lettering, and over ice on bird focal image.  Let dry.

Use Epiphany Crafts Shape Studio Tool and bubble caps to punch 3 additional bird images from patterned paper.  Mount onto round metal charms.

Tie charms onto twine pieces, using Get-it-Straight™ Laser Square to ensure charms are aligned.

Add silver snowflake charm, extending out from lower left corner of bird image, and add ring of twine around bird image as shown.