Monday, October 28, 2013

Easy Peasy Tote Bag Pocket


I just love tote bags. I guess because I always have something to tote, but I was a bag-a-holic long before I had anything to carry around with me. My grandmother always had a big  handbag that contained everything but the kitchen sink, so I guess it's just in my genes.

Anyway, I am participating in the 2014 Sketchbook Project, a wonderful sharing of ideas and art. I try to carry my sketchbook and an assortment of pencils, water pens, markers and erasers with me when I know I'll have some down time - doctors' offices, traveling, etc. All of this paraphernalia takes up room, thus the need for a tote bag, but not just any tote bag. The sketchbook is only 5" x 7", so a big bag isn't necessary, but all those writing instruments! I hate digging in the bottom of any bag for a pen.

These fabulous new stamps from Ann Butler and KellyCraft were the answer to a prayer for a simple way to dress this little bag up AND hold my writing instruments at the same time. I had seen a baby quilt made by Ann using her stamps at the Craft and Hobby Association Tradeshow this summer, so the idea to use the patterns for quilts was not mine, but I loved the look and thought it was perfect for this tiny tote bag. By using Ann's ColorBox Crafter's Inks, I was able to make this quickly and easily, then heat set it with my iron so it's now washable.
As it turned out, I had many more writing instruments than this pocket was made for, but it fit my sketchbook perfectly. No more bent pages, no more frayed corners, just pristine, blissful white pages. The writing instruments were relegated to the inside of the bag (with maybe one or two of my favorites in the pocket with my Sketchbook), and while I'll still have to dig in it to find just the one I'm searching for, I'll be able to carry twice as many!


Here's how I made it:

Supplies
EZ De's Stamps, EZ-De's 3" Tri Triangle Set A (KellyCraft)
Get-It-Straight Laser Square (KellyCraft)
ColorBox Crafter's Ink, Aruba, Limon and Sweet Pea (Clearsnap®)
Muslin fabric, 8" x 10"
Acrylic block, 5" x 7"
Felt
Iron-on Interfacing
Sewing machine with white thread
Scissors
Fabritac Adhesive (Beacon)
Buttons
Twill tape, 6"
Small tote bag (Hobby Lobby)

Directions
1. Determine one straight edge and put the Laser Square in place. Turn on the beam and place the cursor about 1 1/2" from the right edge. Add both large triangle stamps barely at the edge of your acrylic block, inking one in Limon and one in Aruba. Line the base of the block up with the laser line and press to apply ink to the fabric. Repeat with one of the stamps and Sweet Pea ink, turning the triangle to fit inside the first two. Continue inking and stamping until the fabric is fully covered.
After you stamp the first two triangles, you can probably eliminate the need for the Get-It-Straight Laser Square, but I was taking no chances!
2. Heat set the ink according to package instructions.
#3. Using felt gives you the appearance of a great quilted surface.


3. Cut interfacing and felt to the size of your finished pocket and an additional piece of muslin the size of the pocket front. Iron the interfacing onto the back side of the stamped fabric. Cover with felt and pin in place. Stitch along the triangle lines to suggest quilting.

4. Pin the stamped fabric face up to the extra piece of muslin . Stitch along top and sides and turn the pocket inside out. Tuck the bottom of both pieces of the muslin in to create a false seam, then top stitch the edges 1/4" from the edge all around.

5. Stitch buttons to the front. Use Fabritac to glue the sides and bottom of the pocket to your tote bag.

6. If you're making this for a gift, stamp "Just for You" in Aruba ink on the twill. Attach to handle with stitching and sew on additional buttons.

That's it. This little tote would make a nice Christmas gift as well, and you have plenty of time to get them done!

Tuesday, October 22, 2013

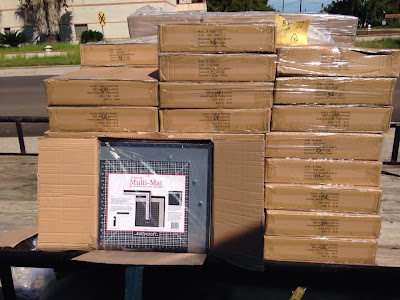
KellyCraft Multi-Mats are here

The long awaited arrival of the KellyCraft Innovation's Multi-Mat is here....


You can order yours right on our web site if you can not wait for them to hit the stores.....

Friday, October 18, 2013

EZ-De's Blog Hop with Clearsnap Day 5


Welcome to day 5 of our Blog Hop with Clearsnap featuring Ann Butler's new ink pads and Ann Butler's EZ-De's Stamps by KellyCraft Innovations!  The KellyCraft Design Team and Clearsnap Design Team will each be showcasing projects so be sure and check both blogs out all week long!


  Whether you choose neutral tones like I did for this project, or customize your colors to match a friend or family member's kitchen or bathroom - EZ-De's stamps & Clearsnap ColorBox Crafter's Ink make it easy to create this useful housewarming gift idea which started with a dollar store hand towel. 


 Ann Butler's new custom colors of Crafter's Ink on a white towel would really brighten up any space.

Materials:

EZ-De's Stamps by Ann Butler for KellyCraft - 1x3 Rails Set A
Clearsnap ColorBox® Crafter's Inkpad - Night
Blumenthal Lansing Favorite Findings - Gold Rounds Sew-on Gems 
Brown embroidery thread, needle, scissors
Towel with flat bar strip

Instructions:

Ink EZ-De's rail stamp with Crafter's ink and stamp onto flat bar strip of towel.  The clear stamps make it easy to align each section when stamping across the towel.  Heat set with an iron.

Repeat on back of towel, and opposite end of towel if towel has two flat strip sections.


Arrange sew-on elements over stamped strip.  Stitch in place with embroidery floss.


Visit Cindi's Blog

Thursday, October 17, 2013

EZ-De's Blog Hop with Clearsnap Day 4


Welcome to day 4 of our Blog Hop with Clearsnap featuring my new ink pads and my EZ-De's Stamps manufactured by KellyCraft Innovations!  The KellyCraft Design Team and Clearsnap Design Team will each be showcasing projects so be sure and check both blogs out all week long! 

I created a video to show how easy it is to use the EZ-De's Stamps 

Wednesday, October 16, 2013

EZ-De's Blog Hop with Clearsnap Day 3


Welcome to day 3 of our Blog Hop with Clearsnap featuring Ann Butler's new ink pads and Ann Butler's EZ-De's Stamps by KellyCraft Innovations!  The KellyCraft Design Team and Clearsnap Design Team will each be showcasing projects so be sure and check both blogs out all week long!

Created by Lisa Rojas, Stampin' Queen Creations
Give The Queen A Call!


This pillow project is very near and dear to my heart.  The pillow is special to me because I was able to create it using a brand new stamp line EZ-De”s™ by KellyCraft and a new inkpad line,
AnnButler Designs™ ColorBox Crafter’s™. Both of these fabulous new products were designed by my close friend and fellow designer, Ann Butler.  Ann sent her new line of stamps and inkpads to me and asked if I would design a project with them.  I was having so much fun playing with these stamps that I barely finished the project.  Ann’s stamps are so versatile they’re a blast to work with.  You can create all kinds of different patterns with them.  The new inkpads are so vibrant that the colors just pop off your fabric, paper or whatever project you’re working on.   I have always wanted to learn how to quilt but I just never seemed to find the time to learn.  This pillow project is my view on quilting and the best thing about it is there’s no sewing machine involved.  Now that’s my kind of quilting!


Materials
Flour Sack or Muslin, ½ yard
Pillow insert
Buttons Galore® Buttons, daisy delight, butterfly
Embroidery thread, white
Ribbon, 1”, lavender
Cardboard
Needle
Instructions
1. Fold flour sack or muslin in half and place a piece of cardboard in between.  Stamp pattern out first on a piece of paper.  Stamp out design on the fabric using the paper as a reference.  See photo for the colors and patterns that I used or create your own pattern. Place in dryer for 15 minutes to heat set.
2.  Place pillow insert in between the stamped fabric, pin the front in place leaving the back unattached.  Using white embroidery floss and a 3” long needle, attach buttons to stamped squares through the pillow insert but do not sew them to the back of the fabric.
3.  Wrap the back of the fabric around the back of the pillow insert and glue in place.   Pull the front tight and adhere to pillow.  Fold each side under three times and adhere to pillow insert.  Add ribbon to each corner of the pillow and tie in a bow. 


Visit Lisa's Blog

Tuesday, October 15, 2013

EZ-De's Blog Hop with Clearsnap Day 2


Welcome to day 2 of our blog hop with Clearsnap, makers of fabulous inks, sprays, embossing powders and so much more!  The KellyCraft Design Team and Clearsnap Design Team will be showcasing KellyCraft's new line of EZ-De's Stamps paired with Clearsnap Inks....

With the holiday season rapidly approaching, my thoughts have turned to gift giving. While it may be a little early, if I don't get started now, I will never get it all done! I have made coasters in the past, and when I saw the EZ-De's by KellyCraft Flourish Alphabet stamps, I thought how perfect they were to make monogram coaster sets. And I love how the Crafter's ink works on all types of surfaces and that there are multiple colors to choose from.

Supplies used:
EZ-De's Flourish Alphabet stamp set
ColorBox Crafter's ink - Clearsnap
Life Is Good stamp set - Close To My Heart
Tumbled marble 4x4 tiles
Paste Finishing Wax - Minwax
Get-It-Straight Laser Square
Felt bumpers
Offray ribbon


 First, wipe the excess dust off of your tiles. Then stamp the flourishes. To get the lighter color, I use a technique I learned from my wonderful friend LaJeania Hicks. Ink your stamp then stamp on a scrap piece of paper to lighten the ink. How light you want the color determines how many times you stamp it on the scrap. I did it twice then stamped on the tile.


Next, using my Get-It-Straight Laser Square, 
I measured 1 & 1/4 inch from the bottom of the tile to stamp the K.
Once the ink is dry, waterproof the tiles by coating with finishing wax.


 After the wax is dry, buff the tile. It will give it mild sheen.


Next place self adhesive felt bumpers to the bottom of the tile and you have a coaster!


Repeat to make a set, place together and finish off with a nice bow.
 A thoughtful and beautiful personalized gift ready for giving! 
 
With all the colors of ink to choose from Plus the 
BRAND NEW Ann Butler colors above
(which have just been released today), 
an entire alphabet, 
plus you can use any stamps for the background, 
it's easy to personalize these coasters to anyone on your list.

Monday, October 14, 2013

EZ-De's Blog Hop with Clearsnap


Join us everyday this week while we blog right along with Clearsnap, makers of fabulous inks, sprays, embossing powders and so much more!  The KellyCraft Design Team and Clearsnap Design Team will be showcasing KellyCraft's new line of EZ-De's Stamps paired with Clearsnap Inks....

Today's project is by LaJeania Hicks:

"Once Upon A Time"

I have been wanting to scrap this picture of our daughter, Kendall, for awhile, but couldn't come up with just the right paper and layout. When I saw the new EZ-De's stamp set by Kellycraft, I thought a layout with hexagons in the colors to match her outfit would be perfect. I love the look of a wood grain background, so I found this piece of paper that looked like barn wood to use as my base.  I then Cricut cut hexagons on white paper and stamped them with each design using the ColorBox Crafter's ink in Sweet Pea, Aruba, Limon, Purple, and Spiced Plum. I love how the colors match her outfit!


Supplies:
EZ-De's Stamp Set - Hexagon Set A
Dakota Paper Pack - Close To My Heart
Lagoon, Pear, Cotton Candy, & Gypsy Cardstock - Close To My Heart 
Sparkle Flourishes - Close To My Heart
Accent Essential Cricut Cartridge
Adhesive (Glue Dots, Pop Dots, Scotch)

Instructions

Gather all of your supplies.  Cut all papers as follows- Cotton Candy - 6"x8"; Gypsy 5.5"x7.5"; White Daisy Cardstock - Cricut Cut Hexagons at 2"; Lagoon and Pear - Cricut Cut Title.


Stamp all hexagons using the EZ-De's stamps and ColorBox Ink.


Using the KellyCraft Get-It-Straight-Laser-Square, align the hexagons to make a pattern across the page.


Using the KellyCraft Get-It-Straight-Laser-Square, align the photo mats and picture leaving a 1/4" mat around each. 

Using the KellyCraft Get-It-Straight-Laser-Square, align the photo on the page. 


Using the KellyCraft Get-It-Straight-Laser-Square, align the title to the corner of the page. 


What layout would be complete without a little bling! 


Visit LaJeania's Blog
  Be sure to visit the Clearsnap blog to see what they created with the new EZ-De's Stamp Line!

Wednesday, October 9, 2013

Halloween Wishes Card with KellyCraft


Materials: 

KellyCraft® Get-it-Straight™ Laser Square
Spellbinders® Grand Calibur
Spellbinders® Graveyard Scene dies
Core’dinations Vintage Collection - orange and grey cardstock
Halloween Hullabaloo Glimpses by Signify Pink patterned paper
Beacon Adhesives® Zip Dry™ Adhesive
Chartreuse twill tape 
Clearsnap ColorBox® Donna Salazar™ Mix’d Media Inx™ - Black
Westcott® paper trimmer
Westcott® scissors 
Happy Halloween stamp 

Instructions: 

Cut patterned paper to 4” x 12”, fold in half to form card. 

Use Grand Calibur® and Graveyard Scene die to cut graveyard from grey cardstock.   


Use fingertip to add a light touch of black ink to enhance embossed areas on graveyard. 

Cut piece of orange cardstock approximately 2 1/8” x 5 3/4”.

Use fingertip to add light touch of blank ink over orange cardstock. 

Use Get-it-Straight™ Laser Square to align graveyard on orange cardstock and mount. 

Mount pieces of green twill on left and right sides of card front, approximately 1” from edge. 

Use Get-it-Straight™ Laser Square to align orange cardstock with graveyard on center of card. 


Stamp verse onto orange cardstock with black ink, use finger to add light touch of black ink around verse.  

Cut piece of patterned paper for mat beneath verse.  Add strip of green twill to left side about 1/2” from edge.  

Use Get-it-Straight™ Laser Square to align verse and mount, then use Use Get-it-Straight™ Laser Square to align verse with mat and mount inside card. 

Friday, October 4, 2013

KellyCraft Friends Forever Card

Created by: Lisa Rojas, Stampin' Queen Creations
Give The Queen A Call!

I love to design cards.  Creating cards is how I started out in this business almost 20 years ago, (did I mention I was only 12 at the time! hee hee!) and I have been creating cards ever since.  My favorite technique for card making is layering my cards with different papers and embellishments and since I can't draw a straight line even with a ruler, laying my cards became a huge burden. But since finding the KellyCraft Get-it-Straight Laser Square, laying my cards and scrapbook pages has never been easier!

Let me show you how to create this nice and simple card for your friends.  They'll love you even more because you took the time to create a handmade card instead of a store bought card, and you'll love it also because although you made it yourself, it didn't take you days to create it.

 Friends Forever Card
Finished Size- 6"W x 5 1/2"H
Materials
Cardstock- Black, Burgundy, Dark Green, Ivory
Pattern Paper
Foam Tape
1/4" Sheer Ribbon- Ivory
Mini Brads
Tim Holtz Distresser Tool
1/8" Hole Punch

Instructions

Gather all of your supplies and cut your papers as follows:
Black 6"W x 11"H folded in half, this is your card base.
Pattern Paper 5 3/4"W x 5 1/4"H, Burgundy 4 3/4"W x 4 1/4"H,
Dark Green 4 1/2"W x 4"H and Ivory 4 1/4"W x 3 3/4"H.

On a scrap piece of ivory cardstock, stamp hanging rod with
mudslide inkpad.


Stamp sign/frame on ivory cardstock with mudslide inkpad.

Stamp word stamp inside sign/frame with dark cherry inkpad.

Cut out both images with scissors.


Using the distresser tool, distress only the bottom edges
of each paper.

Align sheer ribbon along the center with the 
Get-it-Straight Laser Square.  Adhere ribbon with
Zip Dry glue. 
Layer pattern paper to card base with the
Get-it-Straight Laser Square. Adhere together with
Zip Dry glue. 

 Continue to layer the cardstock and adhere together.

Tie bow around these layers of cardstock.  Apply a small
amount of glue to hold in place.

Align the last layer of cardstock to the card base and adhere
together with glue.

Adhere two small pieces of ribbon to the back of the
hanging rod.  Punch four holes and attach the brads.
Apply foam tape to the backs of the hanging rod and
the sign/frame.  Adhere both images to the card.

Your card is now complete and your layers are straight by using