Showing posts with label Duck Commander. Show all posts

Thursday, February 19, 2015

Hangin’ with the KellyCraft Dudes Layout by Candice Windham

Hangin’ with the KellyCraft Dudes
Designed by Candice Windham

Every January, I attend the Craft and Hobby (CHA) convention in Anaheim, California. This is where all the new items in the world of craft creativity are unveiled, where new uses for the older ones are shown and where I get to hang out with people who think like me.

Some of the people who think like me are the folks from KellyCraft™, Aaron and Jimbo. They premiered the KellyCraft™ Get-it-Straight™ Laser Square the first time I met them at CHA several years ago, and they have been coming up with something new every year since. (If you don’t have a KellyCraft™ Get-it-Straight™ Laser Square and the Multi-Mat™ Docking Station, you need one! See the special offer here.) This year was no different with their exclusive line of Duck Commander® stamps. These great stamps come in both red rubber and clear polymer and feature the Robertsons, the first family of duck calls.

This year’s CHA KellyCraft™ booth featured a photo station, so how could I not have my pic made with Willie and Si Robertson? The only problem is that I wasn’t wearing camo, so I stuck out like a sore thumb… kind of like Si’s tea glass. At least we were both the same color.

Here’s how I created this scrapbook page:

Supplies:

KellyCraft - Get-it-Straight™ Laser Square
                  - Multi-Mat™
                  - Duck Commander® Clear Polymer Stamps, Set 1
Clear acrylic block
Card Stock, one 12” x 12” sheet, two 12” x 4” pieces and two 8 ½” x 11” pieces
Spellbinders® - Grand Nestabilities Dies, Set LF-190
                        - Grande Calibur
Viva Decor Pearl Pens, bronze and gold 
Ranger Distress Ink Pads, Scattered Straw, Pine Needles, Vintage Photo and Broken China 
Tags, three small, one medium and one large
French General Cording, Brown 
Kool Tak - Foam Squares
                - Premium Extreme Adhesive 
                - Artist’s Tape 
Marvy Brown marker
Printed photo
Hole punch, ¼”
Scissors

Instructions:

Note: All pieces are sponged with Vintage Photo ink along the edges.
Note 2: In step 1, the page is set slightly outside the Multi-Mat™ Guide top allow for the Acrylic block, so the center is actually at 6 1/4”

1. Line up your background paper one the Get-it-Straight™ Laser Square and Docking
Station. Beginning in the center of the page, set the Get-it-Straight™ Laser Square arrow at 6” and stamp the Duck Commander® image with Pine Needles ink. Stamp two more stamps approximately 1” apart in that row. Stamp the last stamps on the row, allowing the image to run off the edge. Repeat this process, setting your guide at 3” and 9” and offsetting the rows above and below the first row. Repeat until the page is full.

2. Repeat this process in the empty spaces with the Happy, Happy, Happy stamp and Scattered Straw ink. Set aside.

3. Die-cut the photo using the second-largest image in the Spellbinders Grand Nestabilities set and die-cut the card stock backing with the largest die. Adhere these pieces together using Kool Tak Premium Extreme Adhesive. Punch holes either side of the photo and run brown cording through each hole.

4. Apply Kool Tak  Foam Squares to the back of the photo mat and adhere it to the stamped page, using the Get-it-Straight™ Laser  Square. Wrap the cord to the back of the page and adhere it in place with Kool Tak Artist’s Tape.

5. Holding the two pieces of 12” x 4” card stock together cut one edge to mimic grass. Flip one piece over so the grass pieces don’t line up perfectly and ink both pieces with several ink colors.
Tip: When you don’t have the color of card stock you need, find a similar or lighter shade and ink it to match with one or more of the inks you are using on the page. It may not be perfect, but it will look just fine.

6. Adhere the first piece of card stock to the bottom of the page. Adhere the second, placing it about ½” below the first, and then trim off the excess on the bottom of the page.
7. Trim three tags to fit the area above the photo. Sponge the tags
with Vintage Photo, Scattered Straw, Pine
Needles and Broken China. Using the brown marker, ink one word
at a time on the Happy, Happy, Happy stamp and stamp it on the tag. Repeat with the other two tags. Tie each with a knot on the brown cord and use the KellyCraft Get-it-Straight Laser Square to line up the tags, keeping the center tag straight and angling the other two. Wrap the excess cord to the back at each corner and secure with Kool Tak Artist’s Tape.

8. Ink the largest tag with all the inks. Sponge the edges of the medium tag with Vintage Photo and tie the two together. Write your sentiment on the medium tag, and then tie them to the cord at the top of the page. Place a little adhesive on the back of each tag to hold it in place. 

9. For the finishing touches, apply dots of the Pearl Pens over the entire page and then scribble along the bottom to mimic weeds.

With my KellyCraft™ products, I am assured of good stamped images and nice, straight lines with no effort on my part. I’m also assured of a great memory from CHA 2015!


Tuesday, January 13, 2015

Happy Happy Happy Birthday Layout by Kristina Beagle

Happy, Happy, Happy Birthday Layout 
by Kristina Beagle 

Today we have a quick and simple scrapbook page showing the fun versatility of the Duck Commander® stamps!


Materials:

KellyCraft™ - Get-it-Straight™ Laser Square
                      - Multi-Mat™
                      - Duck Commander® Wood - Happy Happy Happy
DCWV; Silky Smooth cardstock
Versa Magic ink pad
A La Mode; Pink embossing powder
Cricut Explore
Miss Kate Cuttables; Birthday Cupcake cuts 

Instructions:
1. I started with my base 12x12 sheet of cardstock and found matching pieces to coordinate. As always, I began by cutting mats for my 4x6 photos onto some 4 ¼ x 6 ¼ inch mats.

2. Next I cut  a 12x3 inch strip of neutral cardstock to tone down the background and later provide a space to mount my embellishments and title, and aligned and adhered with my Get-it-Straight™ Laser Square

3. I then cut a 9x7 base for my photos, lined up with my Get-it-Straight™ Laser Square and adhered to the page.

4. Next I aligned and adhered my photo mats and photos. I typically adhere my photos onto their mats first, then the page, but now have found it easier to do the opposite and line them up with the Get-it-Straight™ Laser Square after the mats are on the page. 

5. To finish the page off, I stamped & embossed my sentiment onto a 1 inch circle punch from the same brown cardstock used earlier, and added my title & embellishments previously die-cut.

Wednesday, January 7, 2015

DUCKMEN Layout by Kristin Kelly

                                     
DUCKMEN!  
Designed By Kristin Kelly

Sitting in the water in the cold doesn't sound like a good time to me, but it's just what these hunters needed to find some ducks and have a great hunting trip. And KellyCraft™ helped to record those memories.

Materials:

KellyCraft™ - Get-It-Straight™ Laser Square and Multi-Mat™ 
                    - Duck Commander clear stamp sets 1 & 2
CTMH Pure Adventure stamp set
Paper Loft Huckleberry Pond and Back Country papers
CTMH Timberline paper and cardstocks
Cricut Art Philosophy cartridge
CTMH and ColorBox inks
Scotch ATG
Glue Dots 
Pop Dots


Instructions:

1. Tear a large circle approximately 11 1/2". Cut a strip 2" x 11 1/2" and another 2" x 10" out of your patterned papers. Then cut 2 photo mats, one at 8 1/4" x 8 1/4" and the other at 8 1/2" x 8 1/2". Then ink all of the edges. I used CTMH Desert Sand re-inker and a paintbrush because I love the effect it gives.

2. Next, using your Get-It-Straight Laser Square, attach the large circle.  Then turn your layout and attach your strips.  
And attach your mats and photo.


3. Now, using a sanding block, sand an area on your photo about 2 1/2" x 1/2". Then use your Get-It-Straight™ Laser Square to stamp 'Duckmen' on the photo using ColorBox Bark ink.

Then adhere to your layout.

4. Next, on the Cricut, cut 2 ovals 1 1/2" and 1 3/4", 2 tags 2 1/2" and 2 3/4" and multiple
rectangles in red and green at 2" and in bronze at 2 1/2". Ink the edges of your ovals and tags using the same technique as above. Stamp the Duck Commander Logo on the smaller oval, and the Jase Robertson quote on the smaller tag. The Laser Square keeps it all straight!

Make the shotgun shells by cutting 3/4" off the bronze rectangles and applying to one end of the green and red rectangles and trimming the sides. Attach to layout, some flat and some with Pop Dots.

Attach ovals and place on layout using Pop Dots. Cut a small circle and place an eyelet in the middle to look like a shotgun shell. Attach to your tags and then to the layout using Pop Dots. 

5. Finally, stamp a few ducks in the top corner.

Now, not only was their shooting straight, but the guys have a Get-It-Straight™ layout to remember their trip courtesy of KellyCraft™.

Tuesday, November 18, 2014

Fear the Beard! Card by LaJeania Hicks


"Fear the Beard" Card 
Designed by LaJeania Hicks

The new Duck Commander® stamps from KellyCraft™, are perfect for creating masculine cards. It seems I am always searching for stamps to make cards for the men in my life. These stamps are perfect for our family that loves Duck Dynasty® and the Robinson family. I created this Fear The Beard card for a friend who has been growing out his beard for a while now and it is perfect for No Shave November. Of course I used the the KellyCraft Get-It-Straight™ Laser Square and mat to line up all of the layers perfectly.

Materials:

KellyCraft - Get-It-Straight™ Laser Square
                  - Multi-Mat™
                  - Duck Commander® Clear Stamp Set 1
CTMH - Timberline Paper Pack – Close To My Heart
             - Chocolate Ink Pad
             - Solid cardstock, 1 sheet Chocolate, 1 sheet Bamboo
             - Durables Triangle Studs
Adhesive (Glue Dots, Pop Dots, Scotch ATG)


Instructions:

1. Cut a piece of Chocolate card stock at 5”x7” and one piece at 3.5”x4”. Cut the wood grain patterned paper at 6.75" x 4.75".  Cut
the hounds tooth patterned paper at 3.25”x3.75” and the bamboo cardstock at 3”x3.5”.  Next, sponge ink the edges of all pieces of paper with the Chocolate ink.

2. Use your Get-It-Straight™ Laser Square to stamp the images on the Bamboo Cardstock using Chocolate ink.


3. Use your Get-It-Straight™ Laser Square to align the mats to create layers.


4. Use your Get-It-Straight™ Laser Square to attach the center image using pop dots.


5. Using the Get-It-Straight™ Laser Square makes it easy to line up the Triangle Studs perfectly.

This card was so simple and easy to put together using the Duck Commander® Stamp Set and the  Get-It-Straight™ Laser Square.

Wednesday, November 12, 2014

"Work Hard, Nap Hard" Layout by Kristin Kelly


"Work Hard, Nap Hard" Baby Layout 
by Kristin Kelly 

Oh the life of a little one! When work was all about play and the naps were frequent. One might not think of a baby picture layout when looking at the new Duck Commander® stamps from KellyCraft™, but the 'Work Hard Nap Hard' stamp made me think of all the cute pictures we have of James doing his baby 'work' and the naps that followed :). 

Materials: 

KellyCraft™ - Get-it-Straight™ Laser Square
            - Multi-Mat™
            - Duck Commander® wood mount stamp - “Work Hard, Nap Hard”
Cricut™ Artiste cartridge
CTMH - Stardust paper
  - Keepsake and You Are My Happy alphabet stamps
    - Inks, sander and edge distresser
Scotch ATG 
Pop Dots
Paper trimmer, scissors 

Instructions:

Gather your supplies and cut your papers as follows: 
12x12 white card stock bases
(2) 6x12 pattern 1
(1) 6x8 and (1) 4x12 pattern 2
(2) 1x12 pattern 3
(4) 6 1/2x4 1/2 and (4) 3 1/2x3 1/2 blue mats
(2) 6 1/4x4 1/4 green mats

1) I like some good distressing, so I sanded my blue photo mats. Then I distressed the edges of the green photo mats. All other edges I inked with coordinating colors. 

2) Once you adhere the large patterned pieces, use your Get-it-Straight™ Laser Square and Multi-Mat™ to place your strips.  Adhere in place.  

An awesome thing about the laser is that it will shine all the way across both pages, so you will be sure your strips will match from page one to two!

And on a complete side note, it shines so far that if you have cats, they will be entertained while you scrapbook! Here's my cat Pumpkin trying to get the laser as I work :)


3) Now it's time to stamp your titles. I did not use my alphabet stamps very often because I
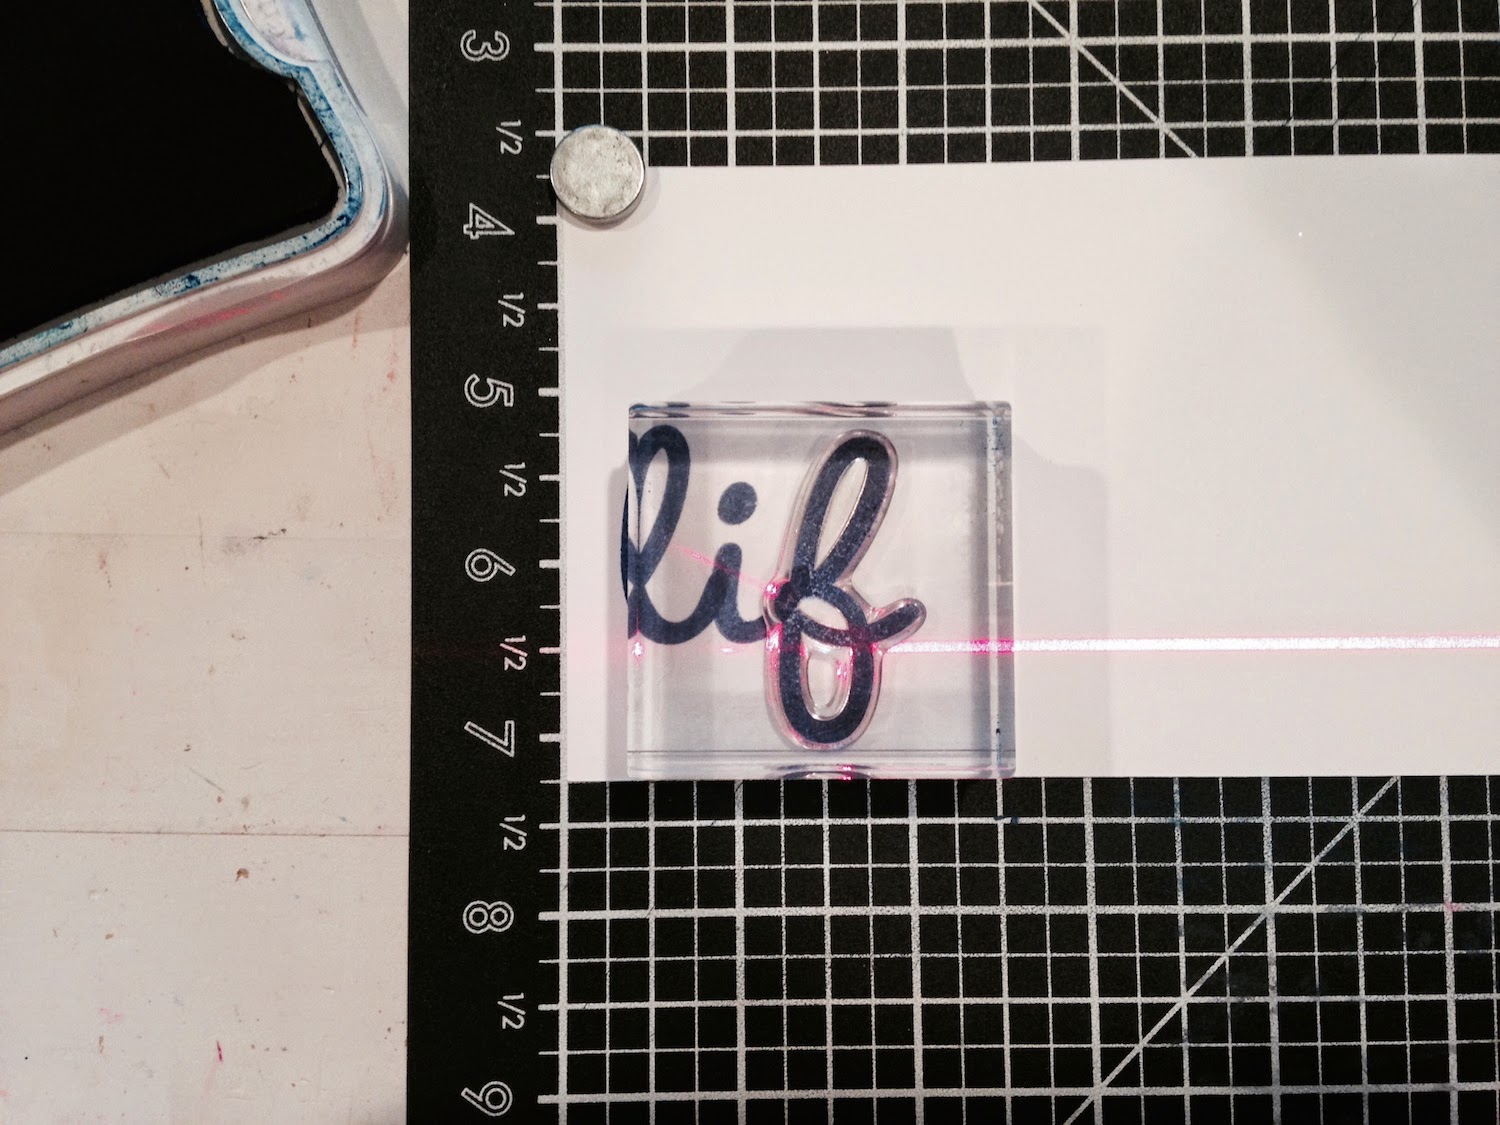
could never get them stamped straight. So, if I wasn't cutting out the letters and placing them individually, I wasn't stamping. With the Get-it-Straight™ Laser Square, I can stamp with confidence! I used scrap card stock, and held it in place with the magnets that come with the Multi-Mat™. Then, shine your laser and go to stamping. You can see the laser through your blocks when using clear stamps so placement is a breeze!

I stamped "life" and "little," then cut them out and set aside. I cut out the gears in different sizes on various patterned papers and card stocks using the Artiste Cricut cartridge. 

4) I cut a circle for the 'Work Hard Nap Hard' stamp and centered that circle on my Multi-Mat™ and held it in place with the magnets. Now, even though this stamp is on a wood block, you can still use the Get-it-Straight™ Laser Square to get it straight and centered. Knowing the center of your circle and the height of the stamp, you can place your laser half the height of the stamp down from the center of the circle and line the edge of the stamp with the laser line.


5) Now adhere your photos and mats together and tie your ribbons. Adhere the larger gears, followed by the photos and mats using your Get-it-Straight™ Laser Square to make sure they're straight! Then stamp the rest of the title. 


6) Pop dot 'life' and 'little' and using your Get-it-Straight™ Laser Square, adhere them in place. Then, shine a line about 3/4 inch from the bottom of page 2 and using a paper piercer pierce 3 holes for brads.


Turn page 1 on its side and do the same. Put in your brads and then place the remaining gears with Pop dots and you have a finished layout! 

Thursday, October 30, 2014

Happy Happy Happy Birthday!

Creative Team member Kristin Kelly shared this fabulous birthday card with us!   She layered papers with inked edges, masked the verse on the Arise, Kill, Eat stamp to make room for Happy Happy Happy, and then added her own Birthday stamp to finish it off.  We love the rustic feel of the papers and barbed wire die cut she chose to coordinate with our fun Duck Commander® stamps!    

Find the entire line here at our website and get FREE SHIPPING on all purchases over $25 until December 24th!