Showing posts with label Graphic 45. Show all posts

Friday, January 2, 2015

"Some Day's Aren't Worth Putting a Bra On!" Card by Cindi Bisson


"Some Day's Aren't Worth Putting a Bra On!"
Designed By Cindi Bisson

 Materials: 

KellyCraft™ - Get-it-Straight™ Laser Square
                    - Multi-Mat™
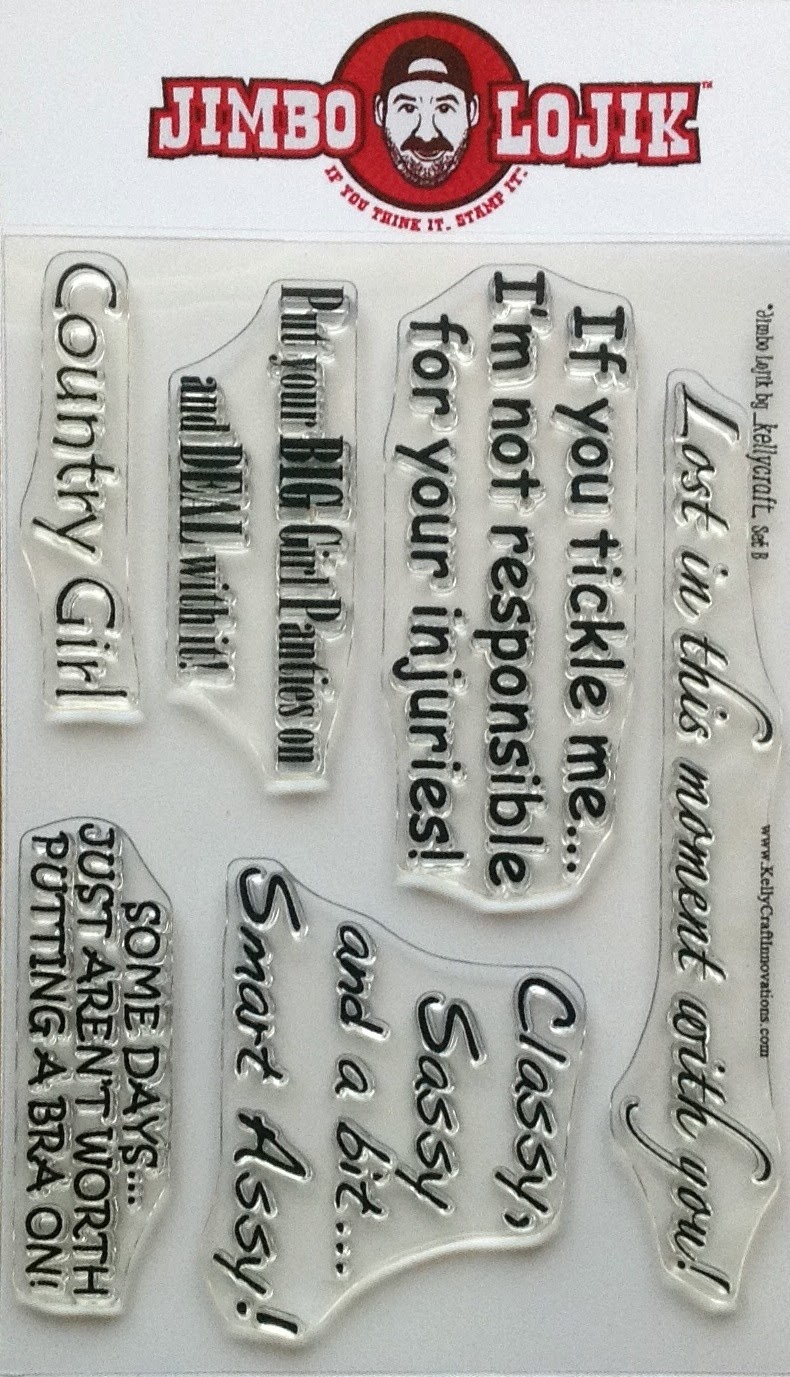
                    - Jimbo Lojik™ Set B 
Brick red, tan parchment card stock
Graphic 45® Domestic Goddess paper collection 
Clearsnap® ColorBox® Archival Dye ink pad - Suede 
Grey velvet 1/4 ribbon 
Grey vellum flower photo corners 
Aleene's® Quick Dry Tacky Glue® 
Westcott® Titanium Bonded Scissors, TrimAir Trimmer 


Instructions: 

1) Cut brick red card stock to 9" x 5 3/4".   Fold in half to form card. 

2) Ink verse with Suede ink.  Use Get-it-Straight™ Laser Square to align and stamp verse on tan parchment card stock. Ink edges of verse with Suede ink pad. Cut brick card stock mat for verse.  Mount.   Add flower photo corner to upper left an lower right corners. 

3) Cut patterned paper to 5 1/2" x 4".

4) Use Get-it-Straight™ Laser Square to align and mount centered on patterned paper.  Add grey vellum flower accents around verse.

5) Get-it-Straight™ Laser Square to align patterned paper with verse, centered on card front and mount.        
6) Mount grey velvet ribbon around patterned paper, using Get-it-Straight™ Laser Square to ensure ribbon is straight. 

Monday, November 10, 2014

"I Don't Have an Attitude Problem" - Diva Card By Cindi Bisson


"I Don't Have an Attitude Problem" - Diva Card 
Designed By
 Cindi Bisson - Behind These Eyes™

Materials: 

KellyCraft™ - Jimbo Lojik™ stamps - Set A 
            - Get-it-Straight™ Laser Square
            - Multi-Mat™
The Robin’s Nest Brown Fleur De-li Card Stock  http://www.shop.robinsnest-scrap.net
Graphic 45® Domestic Goddess Collection papers 
AdTech™ Crafter’s Dot Glue Runner™
The Buckle Boutique Dazzling Diamonds Self-Adhesive Sheets - Aqua
Clearsnap® Ann Butler ColorBox Crafter’s™ ink - Aquamarine 
Westcott® TrimAir Premium Titanium Paper Trimmer, Titanium Non-Stick Scissors 
Copper tape, acrylic block 


Instructions: 

1) Cut brown Robin's Nest fleur de-li card stock to 5 1/2” x 12”.   Fold in half to create card. 

2) Cut chosen woman image from Graphic 45® Domestic Goddess paper.   (Image shown is 4 1/4" x 4 1/2".

3) Cut strips of copper tape and mount diagonally across top left and right, and bottom right corners of woman image approximately 1/4” from edge.  

4) Cut two 3/4” squares of aqua Dazzling Diamonds Self-Adhesive Stickers from The Buckle Boutique.  Cut each square in half to create triangle, adhere to each corner slightly overlapping copper tape as shown. 
5) Use Get-it-Straight™ Laser Square to align image approximately 1/4” from top and right edge of card front.  Mount with AdTech dot runner adhesive. 


6) Ink verse stamp with aquamarine ink.  Stamp onto tan parchment card stock.  Trim verse to 2 1/2" x 2". 


7) Apply strip of copper tape to top and bottom of verse overlapping verse, using Get-it-Straight™  Laser Square to ensure it is straight.     Apply strip of aqua Dazzling Diamonds Self-Adhesive Stickers centered on copper tape, using Laser Square to align. 


8) Use Get-it-Straight™ Laser Square to align verse approximately 1/4” from bottom and left edge, overlapping bottom left of woman image as shown. 

Thursday, January 23, 2014

Some Days... Just Aren't Worth Putting a Bra On!

Materials:

KellyCraft™ Jimbo Lojik Stamps - Set B 
KellyCraft™ Get-it-Straight™ Laser Square 
KellyCraft™ Multi-Mat™
Graphic 45® Papers - Domestic Goddess Collection 
Clearsnap® ColorBox® Cat’s Eye® QUEties® - Essential - Gold, Black
Crochet trim, vintage button 
Brick card stock, off-white card stock
Westcott® paper trimmer, scissors
Beacon Adhesives® Zip-Dry glue 


Instructions: 

Cut patterned paper 10 1/2” x 5”.  Fold in half to form card. 

Cut ladies clothing advertisement from patterned paper.  (Approximate size is 4 1/2” x  3 3/4”).   Ink edges with gold ink.

Use Zip-Dry glue to mount to brick card stock.  Trim to create mat approximately 1/8” larger than patterned paper.  Ink edges with gold ink. 

Use Get-it-Straight™ Laser Square to align image centered on card, mount. 


Ink “SOME DAYS...JUST AREN’T WORTH PUTTING A BRA ON!” stamp with black ink.  Stamp onto off white card stock.  Trim around verse.  Ink edges with gold ink. 


Mount verse onto brick card stock.  Trim to create mat approximately 1/8” wider on left and right sides, and 1/4” wider on top and bottom.  Ink edges with gold ink. 

Use Get-it-Straight™ Laser Square to align stamped image centered on card, approximately 1/8” from right edge.  Mount. 


Mount gold button to top upper corner of verse. 

Use Get-it-Straight™ Laser Square to align and mount crochet trim along bottom of card. 


Cut rectangle of off white card stock with brick red card stock mat to fit inside of card.  Ink edges with gold ink.  Mount inside card. 


Monday, September 2, 2013

Jimbo Lojik Blogging with Clearsnap


Join us everyday this week while we blog right along with Clearsnap, makers of fabulous inks, sprays, embossing powders and so much more!  The KellyCraft Design Team and Clearsnap Design Team will be showcasing KellyCraft's new line of Jimbo Lojik Stamps paired with Clearsnap Inks....

Starting off today is:

Words to the Wise by Candice Windham


When I first saw the new Jimbo Lojik stamps at the Craft andHobby Show, I thought, “Finally, there’s someone who thinks like me.” These word stamps are straight from my Granny’s mouth … or from my Dad, my crazy aunt and all the people I dealt with on a regular basis while I was growing up. There is such a variety of phrases and something for every occasion. I had a tough time selecting one for this hop, because they are all so down-to-earth funny.

I combined them with beautiful Clearsnap Color Box inks, Smooch Pearlized Accent Inks and a couple of my new Spellbinders curvy borders to create this fun card. I plan to send it to one of my good friends, who is definitelya drama queen. We have been saying this to each other for years. Obviously, I can be a bit of a drama queen myself.

Here’s how I did it:

Supplies
Instructions
  1. Cut three borders with Spellbinders curved borders die. The top sheet should be approximately 2 7/8” wide at the bottom and top and 5” tall. Sponge the edges of the top sheet and the bottom curve with Chestnut ink. Stamp the swirl stamp on the top sheet with Chestnut ink. Adhere all layers together.
  2. Stamp the legs stamp on white cardstock. Color with colored pencils. Add Smooch in Pool to the shoes and Gold Lamé to the base. Adhere to card front with Glue Dots.
  3. Stamp Jimbo Lojik sentiment in Wicked Black ink on cream cardstock. Trim top and bottom on trimmer, then tear left and right edges. Sponge all edges with Chestnut and Alpine inks. Trim a scrap of printed cardstock slightly larger than sentiment card and ink edges. Attach the sentiment to the printed cardstock slightly askew, then attach to card with glue dots.
  4. Attach ribbon to back of card with small glue dot. Wrap around the card twice and glue end with glue dot. Tie excess ribbon in a bow around the two strips on the front. Add feather.
  5. Attach to front of folded card. Trim card right edge to fit the curve and ink the edge with Chestnut ink.
That’s’ it. See how easy that was?

Visit Candice's Blog
Be sure to visit the Clearsnap blog to see what they created with the new Jimbo Lojik Stamps!

Friday, February 15, 2013

True Beauty Card

Created by Lisa Rojas, Stampin' Queen Creations
Give The Queen A Call!

One of the techniques that I love to use when I'm designing cards is layering. I just love to layer multiple papers and embellishments on my cards and scrapbook pages. Even though I love this look, I always found it hard to accomplish. I am one of those people who can't draw a straight line with a ruler!

When I found the KellyCraft Get-it-Striaght Laser Square at last summer's CHA show, I thought I had died and gone to heaven! Finally! I found a tool that takes all the guess work out for me and I can layer my projects once again without the stress of making sure everything was straight!
 
 
True Beauty Card


Supplies
 
Cardstock- Ivory, Lt. Aqua, Dk. Aqua, Rose, Green
Foam Squares
Rhinestone Embellishments
Flowers
 
Instructions
 
Make a color copy of the rose image onto a piece
of ivory cardstock. You'll need two copies for layering.
 
 
Cut your cardstock as follows: Base card is 8"H x 6"W.
Pattern paper 7 3/4"H x 5 3/4"W, Rose cardstock
5"H x 3 1/2"W, Dark Aqua cardstock 2 1/4"H x 5 3/4"W,
Green cardstock 3"H x 2/14"W, Ivory 2 3/4"H x 2"W.
 
 
Cut out large rose in sections. Curl edges of each
piece with the end of a paintbrush.


Stamp small frame onto ivory cardstock. On a piece
of scrap ivory cardstock, stamp wording with Sparrow
inkpad.


Cut out center of frame. Attach wording to the back
of the frame with glue.
 
 
Using the Get-it-Straight Laser Square, line up all
of your layers and adhere them with glue.


Once your layers are all in place, adhere your floral
layers to large rose image with foam squares. Next,
adhere rhinestone embellishements, wording and
flowers. Use picture if needed for placement.

This picture shows the layers of the flower.

Wednesday, February 13, 2013

A Ladies Diary Bookmark with KellyCraft

Created by Lisa Rojas, Stampin' Queen Creations
Give The Queen A Card

I just love to read! I cannot go to sleep at night unless I read a little bit first. It's my way of letting go of the day. For this project I wanted to create something beautiful yet simple and I think I have accomplished that with my "A Ladies Diary" Bookmark.

I wanted to make sure when I adhered the two ribbons together for the bookmark, that they were as straight as I could make them. So, once again I pulled out my favorite craft tool, KellyCraft's Get-it-Straight Laser Square.

I hope that you'll take the time to create one for yourself and even some for your family and friends. They would make a great gift with a book for any holiday.

"A Ladies Diary" Bookmark


Supplies

KellyCraft Innovations Get-it-Straight Laser Square
Connie Crystal Mixed Media Suncatcher- Pink
Connie Crystal Mixed Media Suncatcher- Green
Connie Crystal Meter Garland
Graphic 45 Chipboard Pieces from A Ladies Diary Collection
Beacon Adhesives Fabri-Tac Permanent Adhesive
Pink Ribbon
Tan Ribbon
Needle & Thread


Using a Get-it-Straight Laser Square, line up
tan ribbon on top of pink ribbon and adhere

Tie ribbons around both pieces of the chipboard. Next,
tie both strings of crystals through the hole in the
chipboard with the ribbon.


Remove two crystal pieces from Meter Garland.
Attach pieces to the end of the ribbon with a
needle and thread.


That's it! You're done! If you decide to create
this project I would love to hear about it.
Drop me an email at~

Wednesday, January 30, 2013

Layers and layers and layers….


I just love layers. They can highlight a special photo or quote, pull a project together with a layer of printed paper and several of the solids colors from that paper or just be there because I like them. However, I don’t like them if they aren’t uniform unless I intended to make them that way. Unfortunately, when you get your second or third layer off-kilter, as my Granny used to say, the rest of the layers to come will be off-kilter too.

I look back on scrapbook page layouts I created that are glued and glued really tight, and once I put a layer down a little crooked, it just jumps out screaming, “Look at me! She really messed it up this time! Can I get an ‘Amen’?” The KellyCraft Get-It-Straight Laser Square was the answer to my problem. No more crooked page layouts or greeting cards for me. WhooHoo!


This page pays tribute to my Great Aunt Lucy McCaskill and her best friend, also a Lucy, whose last name I do not know. Weren’t they the fashionistas? This photo was probably made in the  early 1900s, and they lived in a small town just outside of Memphis, Tennessee. I don’t know if they had wealthy parents, but I would imagine these dresses were not “store bought’ but probably sewn for them, either by the town seamstress, their own mothers or quite possibly themselves.

No matter who made them, I love this picture and Lucy X 2 seemed the perfect title. I added a journaling tag behind the layer just under the photo so that future generations will know as much as I know about the photo.

Supplies
Alas, there was no information on the maker of the larger sheets of paper and the small layers are all scrap from my stash, but this layout is very adaptable to any papers or cardstock.
All edges expept the lace paper layer were sponged with brown ink prior to beginning attaching the papers.


Green paper 12 x 12
Lace edged paper, 12X 12
Assorted scrap pieces of paper and cardstock, solids and prints
Typewriter stamps (Graphic 45)
Dark Brown Ink Pad (Clearsnap)
Green twine, 18”  (American Crafts)
Large needle
Circular hole punches, ¾” and 1”
Ivory ribbon (Offray)
Flowers (Prima)
Crystal
Scoretape
Quick Grip Adhesive (Beacon)
Label Tab (Sizzix) 
Big Shot (Sizzix)
Viva Decor Inka Gold
Push pin 
Fun foam
Ruler

1. Line up green paper and layer lace edging sheet on top.

2. Center green solid in center of page. The laser light makes getting it straight really simple.

3. Layer on printed paper cut approximately 1/4" smaller all around than the green solid.
4. I punched holes ( Using a ruler and push pin, I punched holes by placing the paper on a piece of Fun Foam to protect my work surface.) 1/4 " apart on the right side, top and about 1" down the left side of the orange sheet. I ran green twine starting on the lower right corner and continuing to the left side. I then layered this sheet onto solid cream cardstock and lined them up on the layout with the help of my Get-It-Straight Laser Square.

5. I placed my first layer for the photo slightly off-center vertically.

6. I added the floral layer and left the left side unglued to create a tag pocket. TIP: You could leave all the layers unglued on one side to create several tag pockets, but leaving both sides unglued only makes the tags fall out.
7. The photo was the last layer.
8. I punched stamped letters on cream cardstock with the 3/4" hole punch, then layered them on to dark brown circles cut with the 1" punch. I turned my page to use the Get-It-Straight Laser Square to line up the lower line of my letters.

9. The finishing touches: I looped the green thread twice, added the needle and held it all in place with tiny drops of Beacon Quick Grip ( put a tiny drop under each place the thread loops to keep it secure). The organdy bow, crystal and paper flowers were added with Quick Grip as well. The journaling tag tab was cut with a Big Shot and rubbed with Inka Gold, the word friends was inserted and it was then adhered to the tag.

The journaling tag and friends tab label were printed on a scrap of paper from my stash (Line it up by printing first on a regular sheet of copy paper, then placing your printed paper scrap over the printed portion adhering the top with tape. Run it back through your printer and you can print on any paper without wasting an entire sheet.

I am very pleased with this page  and amazed that it took such a short time. The hardest part was getting the flowers to lay flat. I finally gave up and will probably have this piece framed in a shadow box with some antique sewing items.

My next post will be more modern for those of you who love that style. I'll probably still ink all the edges with brown ink or some such drab color, though. You can take the girl away from the vintage ink colors  but you can't get the vintage ink out of her blood!

Thursday, November 29, 2012

Hoppy Birdie to you!

I love to make birthday cards. I don't always get them in the mail on time, but I still love the creative process of making them. This sentiment has been around for a long time in one form or another, but I can remember my Dad wishing me "Hoppy Birdie" when I was a child. I don't know where it originated, so if it came from you, please let me know and I will happily give you credit. Otherwise, all the credit goes to my funny, sweet father, who I am so thankful for.

Other things I am thankful for are my KellyCraft Get-it-Straight Laser Square, the fabulous Duetica Lettering Arts Studio, my Big Shot and all the fabulous dies, Viva Décor products, and Graphic 45 and Bo Bunny papers. They just seem to inspire me to create bigger and better things. This little card may not be bigger (well, it is actually a 6" x 6", so I guess that's bigger than the ones I usually make),  but I think it's one of my all-time favorite designs. The first one of these was made for my BFF Linda Gordon Bradshaw for her 65th birthday (I can't believe we have known each other for 52 -count 'em- 52 years!), and I've been making it ever since, just changing the colors, papers and embellishments.
Card Front Detail

The background paper I chose is very busy and not conducive to eyeballing a straight line. Even though your aligning skills may be way up there, it's still hard to get it right the first time with random paper patterns, which can result in damaged paper and extremely frayed nerves. This is where my great KellyCraft Get-it-Straight Laser Square comes in.

Here's how I did it:

Supplies
KellyCraft Get-it-Straight Laser Square
Graphic 45 (51/2" x 5 1/2") and Bob Bunny (6" x 12", folded to 6" x6") Cardstock, plus small scraps for punching
Cream cardstock(Stampin' Up!®)
Chipboard, 51/2" square
Duetica Lettering System Software, Saxi Font
Sizzix Big Shot and Tim Holtz Caged Bird Die
Woven Trim, 8"
Viva Décor 3D Stamp Paint, Copper
Viva Décor Sponge Applicator
Viva Décor Inka Gold, Orange, Lava Green, Cobalt Blue, Lava Red
The Robin's Nest Dew Drops
Ranger Distress Ink, Vintage Photo
Jute from American Crafts
Double Stick tape from Sookwang
Dimensional Glue Dots, assorted sizes
Best Glue Ever from ScraPerfect
Silk flowers and leaves

Directions


Step 1.
1. Apply double stick tape to backside of woven trim. Line up 51/2" square cardstock on the  KellyCraft Laser Square and set the guide at 3/4". Remove backing paper from tape and carefully apply the trim slightly below the laser line. Fold excess to the back of the cardstock.

2. Cut bird, cage and wing from Caged Bird die. Apply Inka Gold to bird and wing and edge with Vintage Photo Distress Ink for contrast.
Step 3.

3. Apply Viva Décor 3D Stamp Paint to the cage using the sponge applicator in and up and down motion to create an uneven surface. This will not only give the look of aged metal, but also the feel. Allow to dry, then add more age with Vintage Photo ink applied randomly, direct to paper. Apply glue dots to back of cage.

Step 4.
4. Using the KellyCraft Get-it-Straight Laser Square, line up birdcage bottom approx. 3/8" from the bottom of the 51/2" square, and adhere in place. Apply Best Glue Ever to openings across the bottom of the cage and add Dew Drops.

5. Use Inka Gold to make the flowers match the background paper. Adhere in place and add Dew Drops with Best Glue Ever. Cut 1/2" circles from scrap printed paper and edge with Vintage Photo ink for the large flower centers. Adhere in place.
Step 5.

6. Cut a small slit in the bird's beak to hold the tag. Slide bird into cage, allowing the head to peek out a little.

7. Print "Hoppy Birdie to You" using the Duetica Lettering Arts Studio software on cream cardstock. I used my finger to add Vintage Photo Distress ink to the edges and across the surface of the tag. Tie hemp around tag, add glue dots to the back and slip between the slits in the bird's beak.

Step 8.
8. Apply large glue dots to the back of the card front and use the KellyCraft Get-it-Straight Laser Square to align it perfectly on the card fold.


That's it. Easy as pie and it looks like you spent hours on it.


I hope you had a wonderful Thanksgiving and were able to hug all the people you love!


I received product from Kellycraft, Viva Décor, ScraPerfect, Sizzix, Bo Bunny and Duetica Lettering Arts Studio.